time for another Sun Ray blog post! I've had a few people email me asking for help setting up a Sun Ray server over the last few months, and despite my attempts to help them get it going there's been mixed results with running SRSS on OpenIndiana Hipster 2025.10.
my Sun Ray server is still on an earlier OI snapshot, so I figured it was about time to try to actually follow the new guides myself.
installing OI in a Proxmox VM
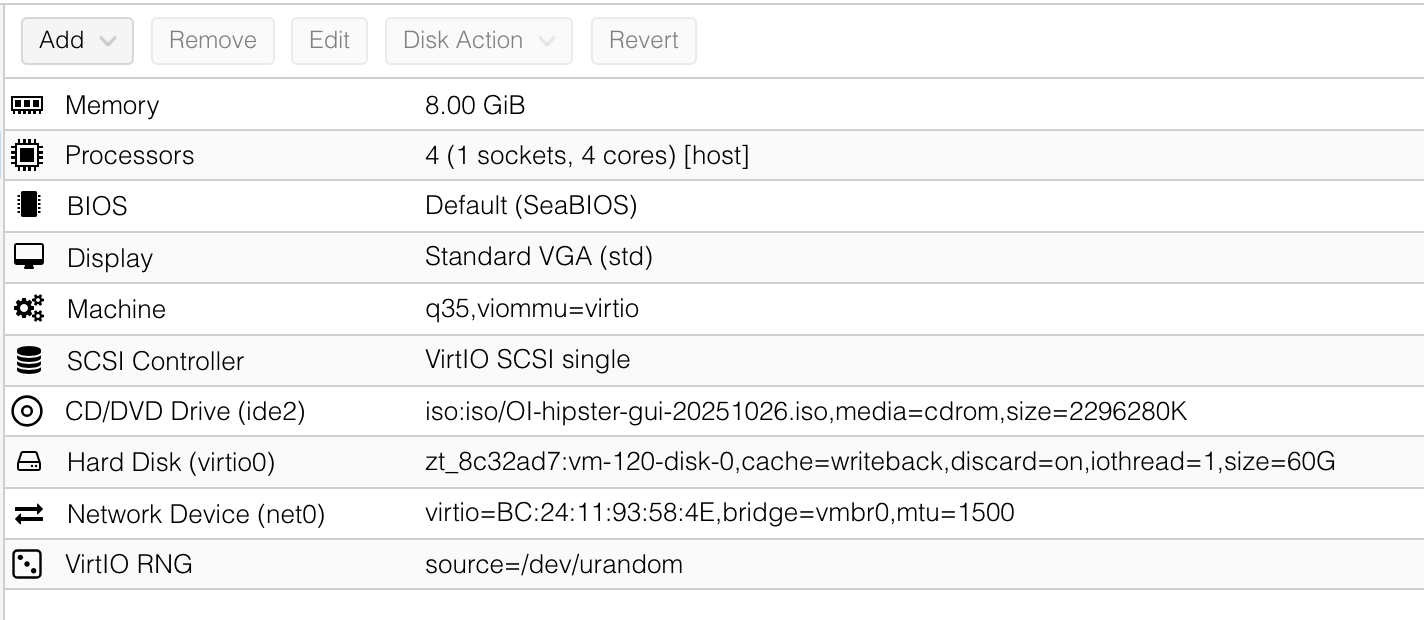
first hurdle - VM configuration. this is what worked for me on a PVE 9.0.11 host, but YMMV:
- Install media: "OpenIndiana Hipster 2025.10 Live DVD (64-bit x86)" from the OpenIndiana downloads page (file name
OI-hipster-gui-20251026.iso) - Guest OS: "Solaris Kernel" (I'm not sure if this shows up in older PVE versions?)
- Machine: type
q35, firmware as SeaBIOS - Graphic card: Standard VGA
- Disks: 60GB, bus set to "VirtIO Block," cache set to "write back," discard turned on
- CPU: model
host, 1 socket, 4 cores - Memory: 8GB
- Network: set model to "VirtIO (paravirtualized)"
don't start on creation, there's a few things to edit! in the Hardware tab of the new VM...
- add a new "VirtIO RNG" device
- edit the "Machine" config, toggle on the "Advanced" checkbox, and set IOMMU to "vIOMMU"
the config for our new VM looks like this:

after that, start the VM, and boot into the OpenIndiana installer. the GUI installer (there's a shortcut on the desktop of the live image) worked fine for me - although it did pop up a couple of error dialog boxes after starting the install, the install continued with no issues when I closed them. if you walk away while it's installing, and come back to a screen lock - the password for the live user is jack.
once it's installed, reboot into your new OI install, and log in as your (normal, unprivileged) user account. open up a terminal - which will likely look like it's broken, because it defaults to black text on a black background for some reason. open the "Edit" menu > "Profile Preferences" > "Colors" tab, and uncheck the "Use colors from system theme" box. use sudo -i to get a root shell.
first off, update the system! things will act Really Strangely if you forget to do this. i'd also recommend enabling the hipster-encumbered repository:
pkg set-publisher -g https://pkg.openindiana.org/hipster-encumbered/ hipster-encumbered
pkg refresh
pkg updateat this point, we start following the steps from the Sun Ray Installation section of the OpenIndiana Handbook. I'll use a block like this one to point out where what I'm telling you to do differs from that guide.
install the sunray-essential package, which brings in all the needed dependencies:
pkg install sunray-essentialdownload and extract the Sun Ray Server Software package, which you can download from https://edelivery.oracle.com after signing up. there are a number of Sun Ray-related listings on archive.org which contain the right files, too - you're looking for V37038-01.zip, which is Sun Ray Server Software version 5.4.0.0 for Solaris 11 i386. the only copy of SRSS 5.4.5.0 I've managed to find is for SPARC (found here, on archive.org - the fact that the OI Handbook says that 5.4.5.0 can be found on Oracle eDelivery seems to be utterly untrue. that said, if you do manage to get SRSS 5.4.5.0 for Solaris 11 i386 from Oracle eDelivery - or from anywhere else from that matter - please send me an email!
bsdtar -C /root -xf V37038-01.zipafter it's extracted, we can tell IPS where to find it, and install the Sun Ray server packages:
pkg set-publisher -g /root/srs_5.4.0.0-Solaris_11plus.i386/IPS.i386/ sunray
pkg install SUNWut-srss SUNWut-srwc
sorting some manual dependencies
the Sun Ray server software requires a period-accurate Java Runtime Environment; and, for the Sun Ray server web administration, a period-accurate version of Apache Tomcat. thankfully, both of these things are present in the Supplemental directory of the Sun Ray Server Software package, so we just need to put them in the right positions:
cd /opt
/root/srs_5.4.0.0-Solaris_11plus.i386/Supplemental/Java_Runtime_Environment/Solaris/jre-6u41-solaris-i586.sh
bsdtar -C /opt -xf /root/srs_5.4.0.0-Solaris_11plus.i386/Supplemental/Apache_Tomcat/apache-tomcat-5.5.36.tar.gz
ln -s /opt/apache-tomcat /opt/apache-tomcat-5.5.36the OI Handbook includes instructions on linking in the JRE - but it says you need to get it from the Oracle website, not mentioning the fact that it's included. (maybe it's not included in the 5.4.5.0 packages? who knows!) the OI Handbook doesn't mention the Apache Tomcat install at all.
once those are installed, we need to install and run the OpenIndiana patch tools for the Sun Ray server.
pkg install sunray/oi-adaptions
/opt/SUNWut/utils/apply_patches
make the Sun Ray server use ISC DHCP instead of trying to use the non-existent Sun DHCP daemon:
rm /etc/opt/SUNWut/dhcp
ln -s /opt/SUNWut/lib/dhcp/isc /etc/opt/SUNWut/dhcpthe below manual patching steps are not part of the OI handbook. these may not be necessary for SRSS 5.4.5.0, but we have to make do here.
there are a couple manual patches needed after running the /opt/SUNWut/utils/apply_patches script:
- in
/opt/SUNWut/lib/utprodinfo, line 322: changepkg list $2topkg info -q $2(note the space betweenpkgandinfo, unlike the lines below!) - in
/opt/SUNWut/sbin/utconfig, line 243: changeLCL_PACKAGE="SUNWlldap"toLCL_PACKAGE="ldap" - in
/opt/SUNWut/sbin/utreplica, line 77: changeLCL_PACKAGE="SUNWlldap"toLCL_PACKAGE="ldap"
now that that's all complete, SRSS is installed - time to configure it!
to do the initial configuration:
/opt/SUNWut/sbin/utconfig- enter a secure admin password
- when asked whether to set up Sun Ray Web Administration, say
Y- when asked for the path to Apache Tomcat, hit Enter as well (the default is
/opt/apache-tomcat, which we set up a symlink for earlier) - say
Nto enabling HTTPS (the default SSL config won't work in modern browsers, and if you enable HTTPS the plaintext port will only ever redirect to the HTTPS port - it's not worth the trouble enabling it) - accept the default port of
1660 - say
Yto enabling remote server administration (without this, the Tomcat server will block requests from outside of specifically configured subnets - it's much easier to say yes here than to correct that later)
- when asked for the path to Apache Tomcat, hit Enter as well (the default is
- say
Yto configuring kiosk mode- you can accept all the defaults for kiosk configuration
- say
Nto configuring a failover group - say
Yto confirm these settings - if prompted for a group name for the Windows Connector, just accept the defaults
to allow Sun Ray clients to connect, the following commands are needed:
/opt/SUNWut/sbin/utadm -L on
/opt/SUNWut/sbin/utpolicy -a -z both -m -Dthe utpolicy invocation above differs from the one in our first post about setting up SRSS - SRSS on OpenIndiana Hipster 2025.10 doesn't support hotdesk sessions ("non-smartcard mobility"), so we can't pass -M, and need to additionally pass -D. installing the needed libraries for hotdesking is apparently possible by adding the same repo we used in the first blog post (https://pkg.toc.de/sunray/), but I haven't tried that.
at this point, you should close anything you have open on the OpenIndiana VM excepting the terminal (because this is about to kick you out of the graphical session!), and run:
svcadm disable graphical-login/lightdmlog in to your user account on the console, sudo -i again, and run:
svcadm enable graphical-login/gdmthis will get you back to a graphical login (but in GDM this time, which the Sun Ray sessions require). enter your username, but before you enter your password, make sure the session type at the bottom of the screen is set to MATE, not GNOME - if you leave it on GNOME, you'll end up at a lovely black screen, unable to do anything!
once you're logged back in, open a terminal, sudo -i, etc - and then you can start the Sun Ray services:
/opt/SUNWut/sbin/utstart -conce the Sun Ray services have started, we're ready to point a DTU to the server!
connecting a client
to point Sun Ray clients towards the Sun Ray server, there are a few options. the easiest to configure for all the Sun Ray clients on your network is to add some static DNS entries to your router (or whatever other DNS server your network uses). pointing sunray-servers and sunray-config-servers at the SRSS host will make all clients auto-configure for the server you point those DNS names to.
if your Sun Ray DTU has firmware loaded which allows entering the inbuilt menu, you can access that menu with Stop+M (on a Sun keyboard), or Ctrl+Alt+Meta+Shift+M (on a standard PC keyboard). selecting the "Servers" menu item will prompt for the IP/hostname of the Sun Ray server(s) to connect to - enter your new SRSS server's IP for both the main server and the firmware server, and leave the log server blank. confirm saving the changes, and use Escape to exit the menu, at which point the DTU will reboot.
if everything has been set up correctly, and your client can reach your Sun Ray server, you should now see a GDM login screen on the Sun Ray client!

getting the Sun Ray DTU firmware
as in the last installment, we'll need to pull the firmware out of a different Sun Ray Server Software package.
none of this is in the OI Handbook either - I guess they're assuming your DTUs are already running suitable firmware...?
same as last time, I grabbed a Linux SRSS package set, and used rpm2cpio to extract the firmware files from the right RPM within. I used SUNWutfw-4.3-50.i386.rpm, found at srs_5.2/Components/10-SRSS/Content/Sun_Ray_Core_Services_4.3/Linux/Packages in the Oracle distribution archive V26331-01.zip (which I found at Sun_Ray_Software_5.2/Linux_x86_(32bit_and_64bit)/V26331-01.zip inside sunray-server-5.x.tar.gz from this archive.org upload of various Sun Ray server software).
rpm2cpio SUNWutfw-4.3-50.i386.rpm | bsdtar -C /tmp -xf -
mv /tmp/opt/SUNWut /opt/SUNWutdfw
rmdir /tmp/opt
then, to set up the TFTP root for the DTUs to pull their firmware from; and make the Sun Ray server populate the firmware:
mkdir /tftpboot
cd /tftpboot
ln -f -s . tftpboot
/opt/SUNWut/sbin/utfwadm -AaV -G forcequick utfwadm parameter explanation: -Aa makes the firmware apply to all DTUs, -V stops the tool from trying to configure DHCP options to point clients to the TFTP server, and -G force forcibly enables the clients' configuration menu (mentioned above)
Sun Ray Web Administration
open your web browser to http://<SUN_RAY_SERVER_IP>:1660 and you should be greeted by the Sun Ray web administration! log in with username admin and the admin password you set earlier.
if a DTU is connected, you should see it in the "Desktop Units" tab, like so:

in closing
and that's pretty much it! i apologise to the people who emailed me asking for help with Sun Ray stuff, only for me to give them faulty info as to setting things up because I hadn't actually done the install on OI Hipster 2025.10 or above. hopefully this helps you get things working, though.