![]()
![]()


Overview
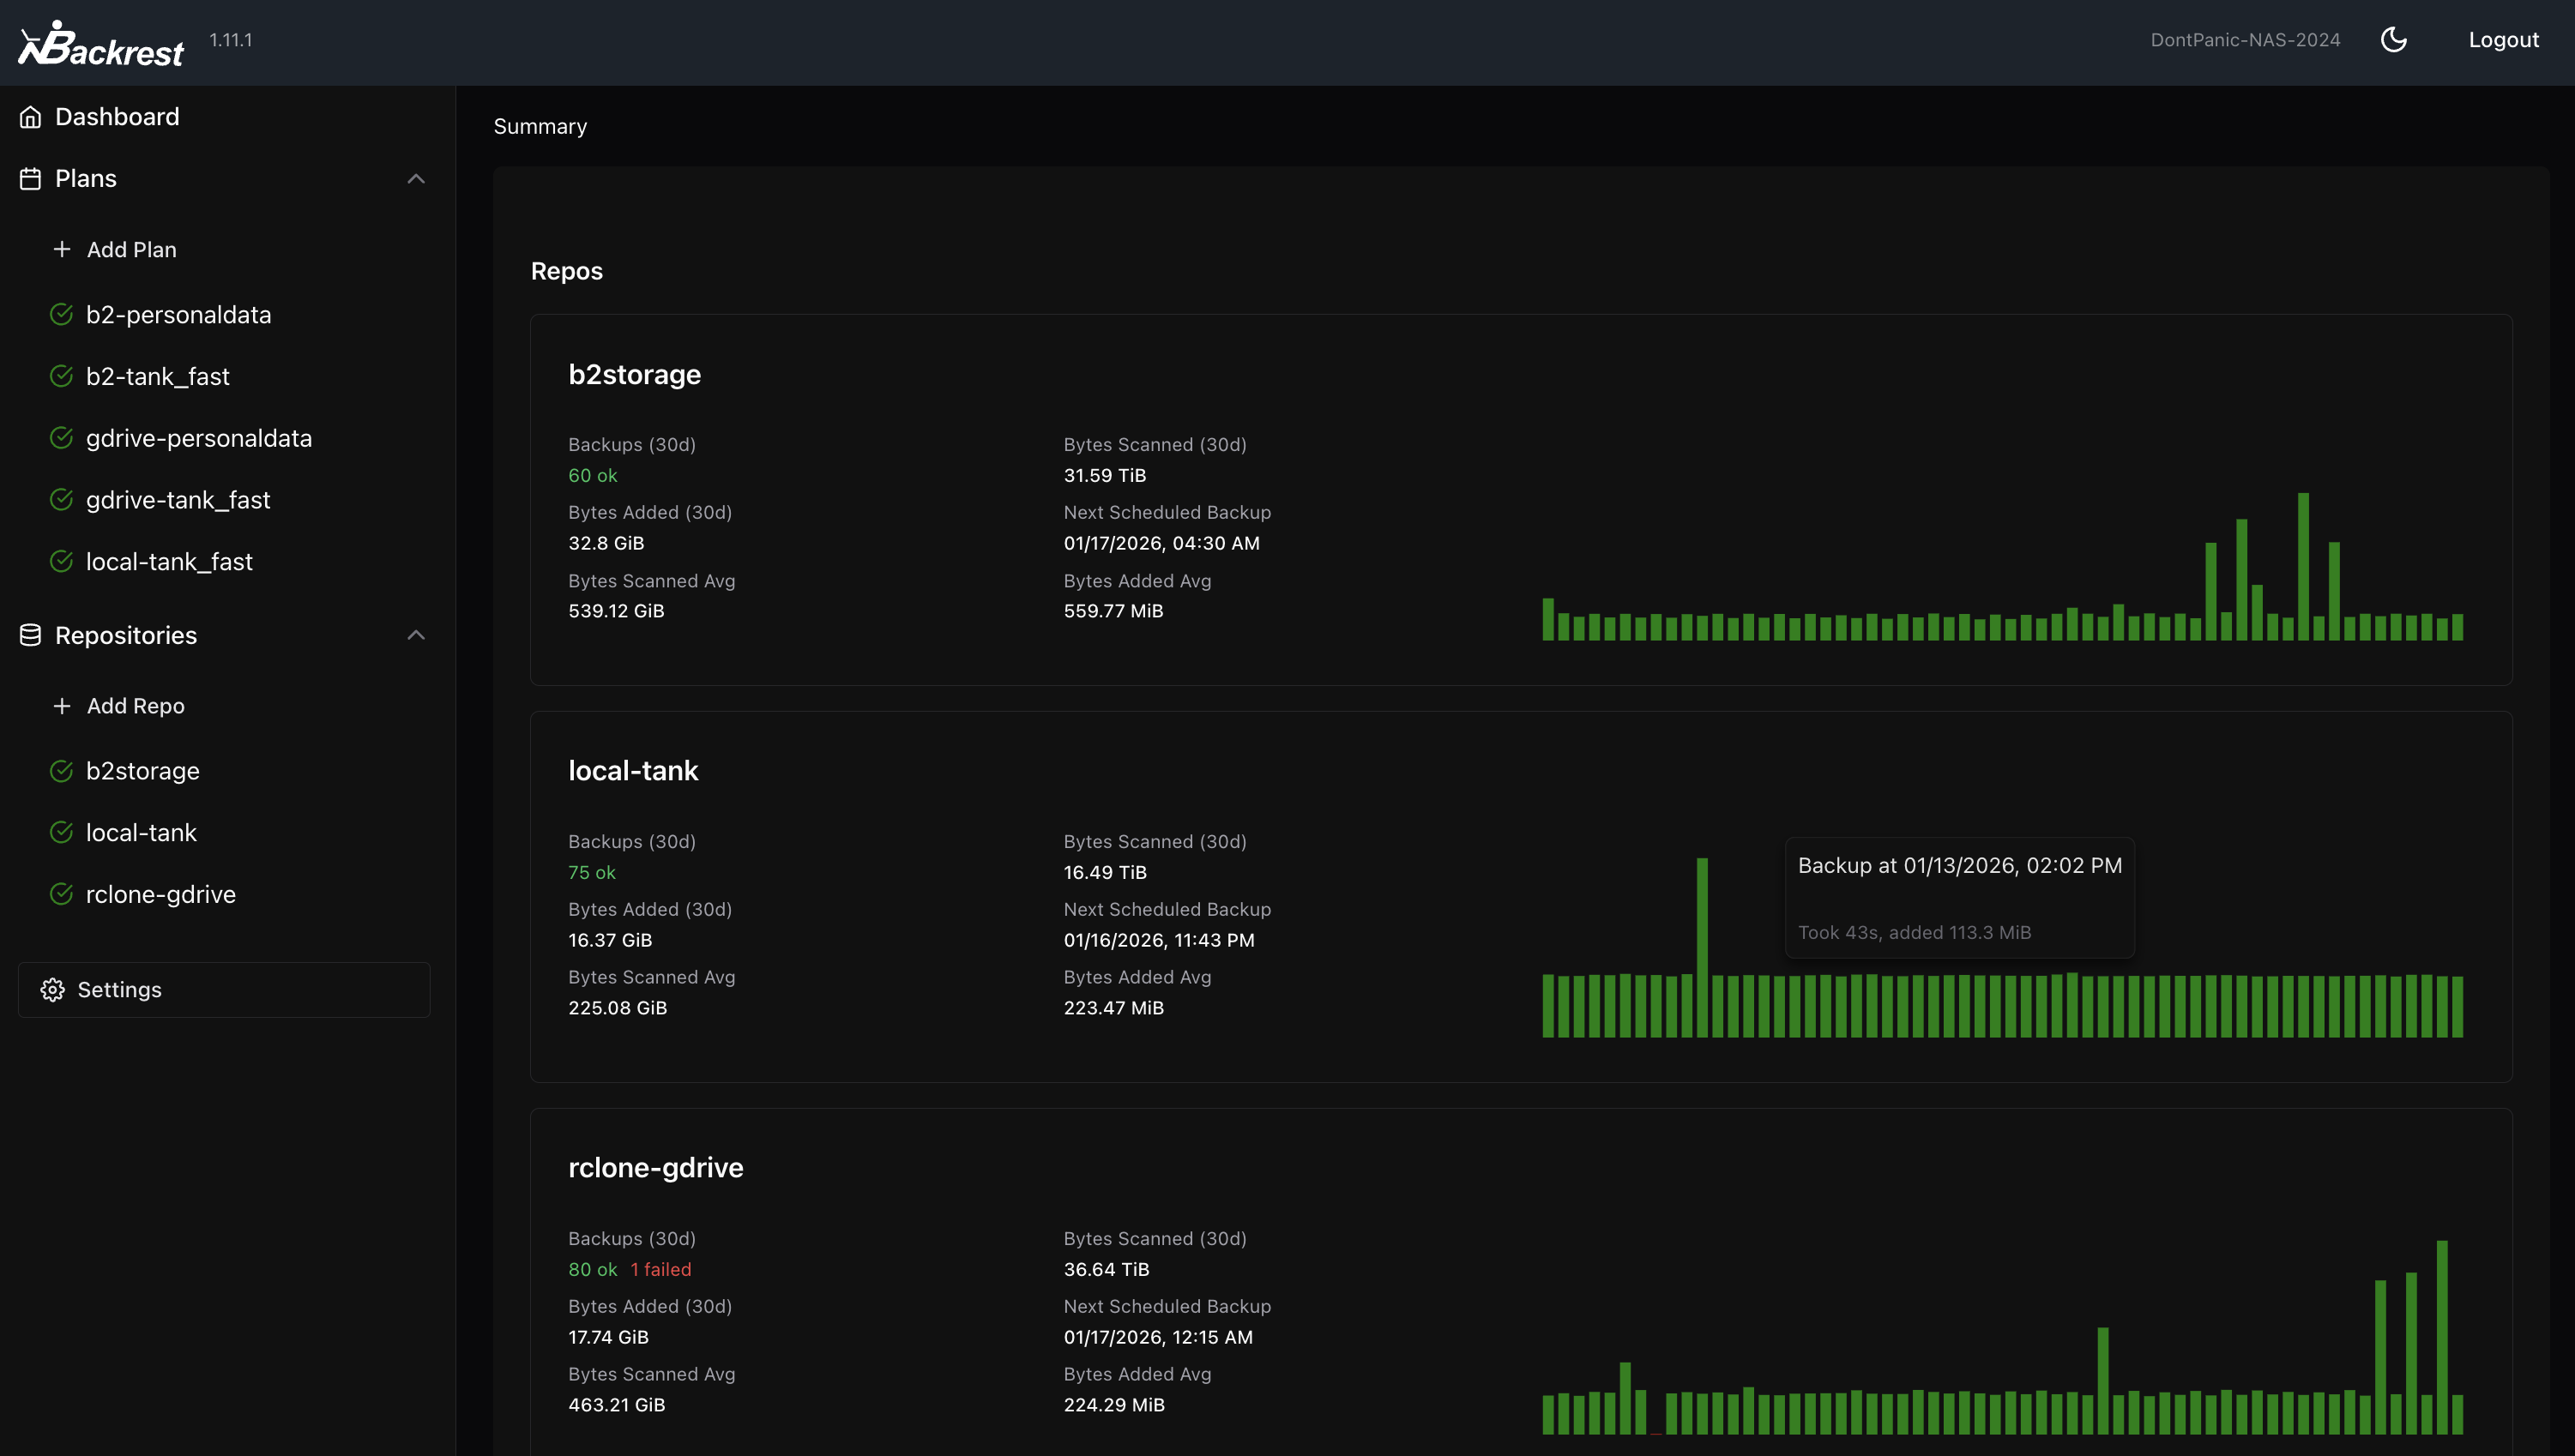
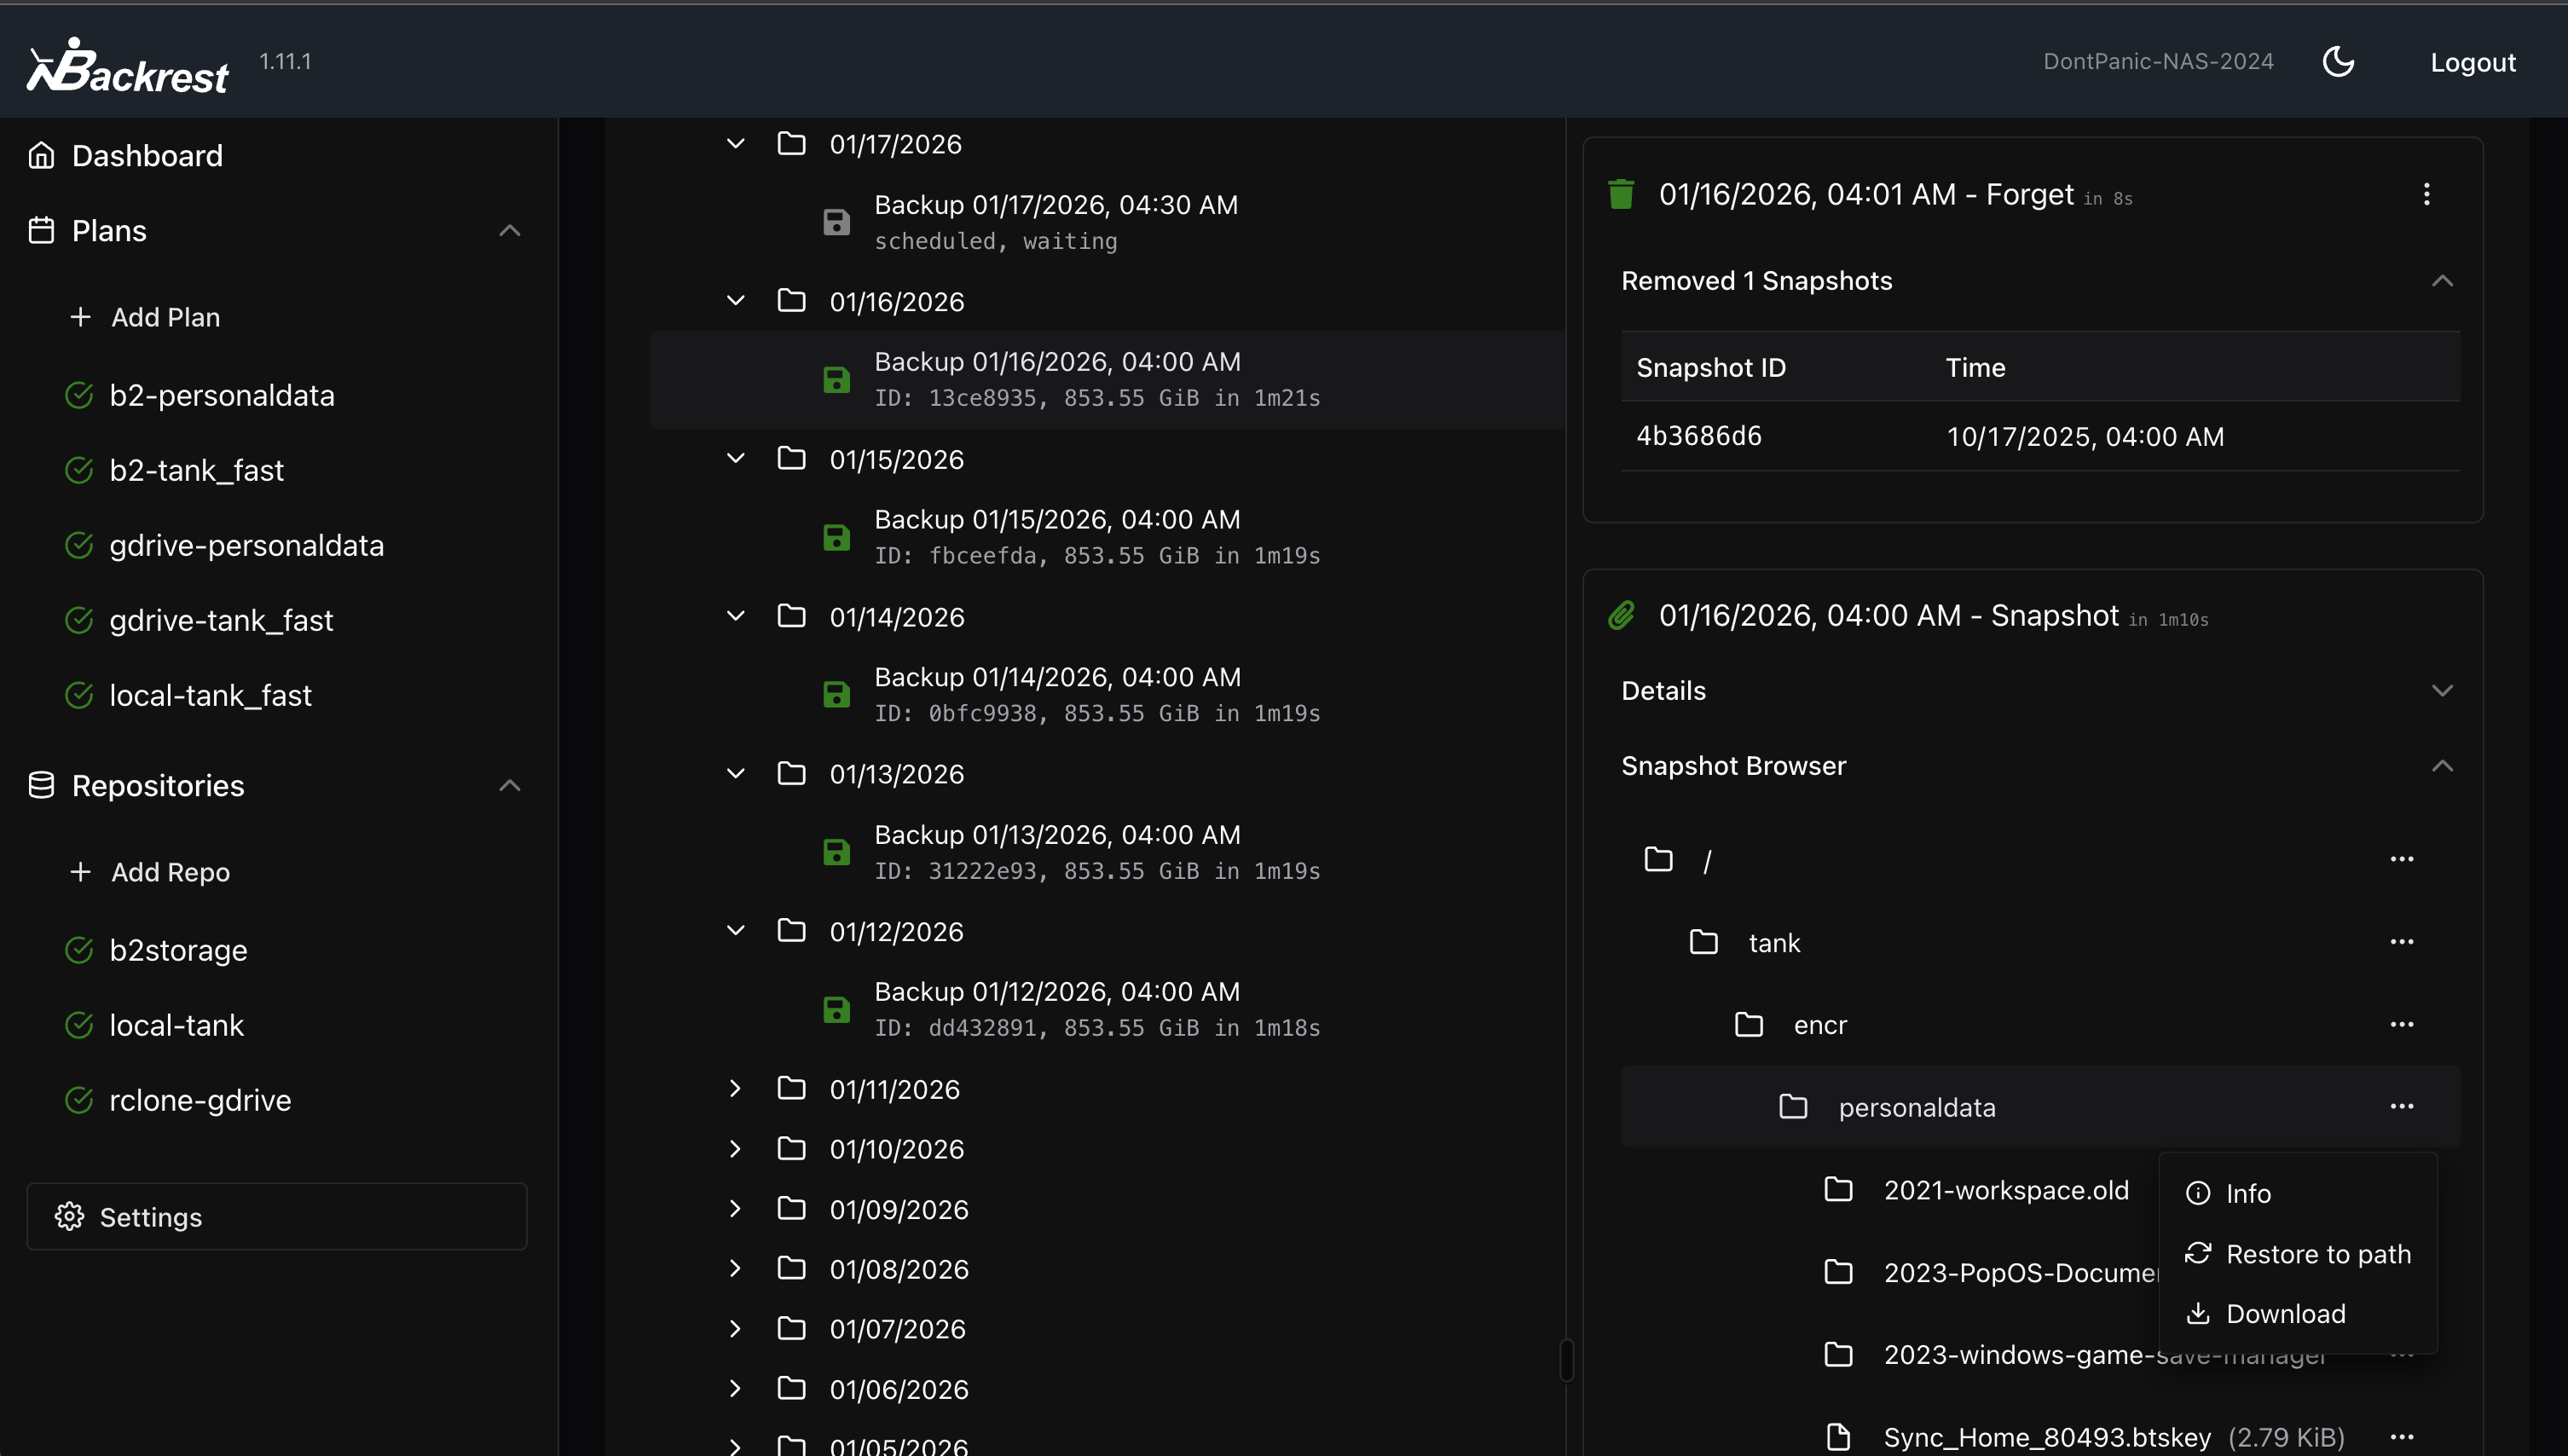
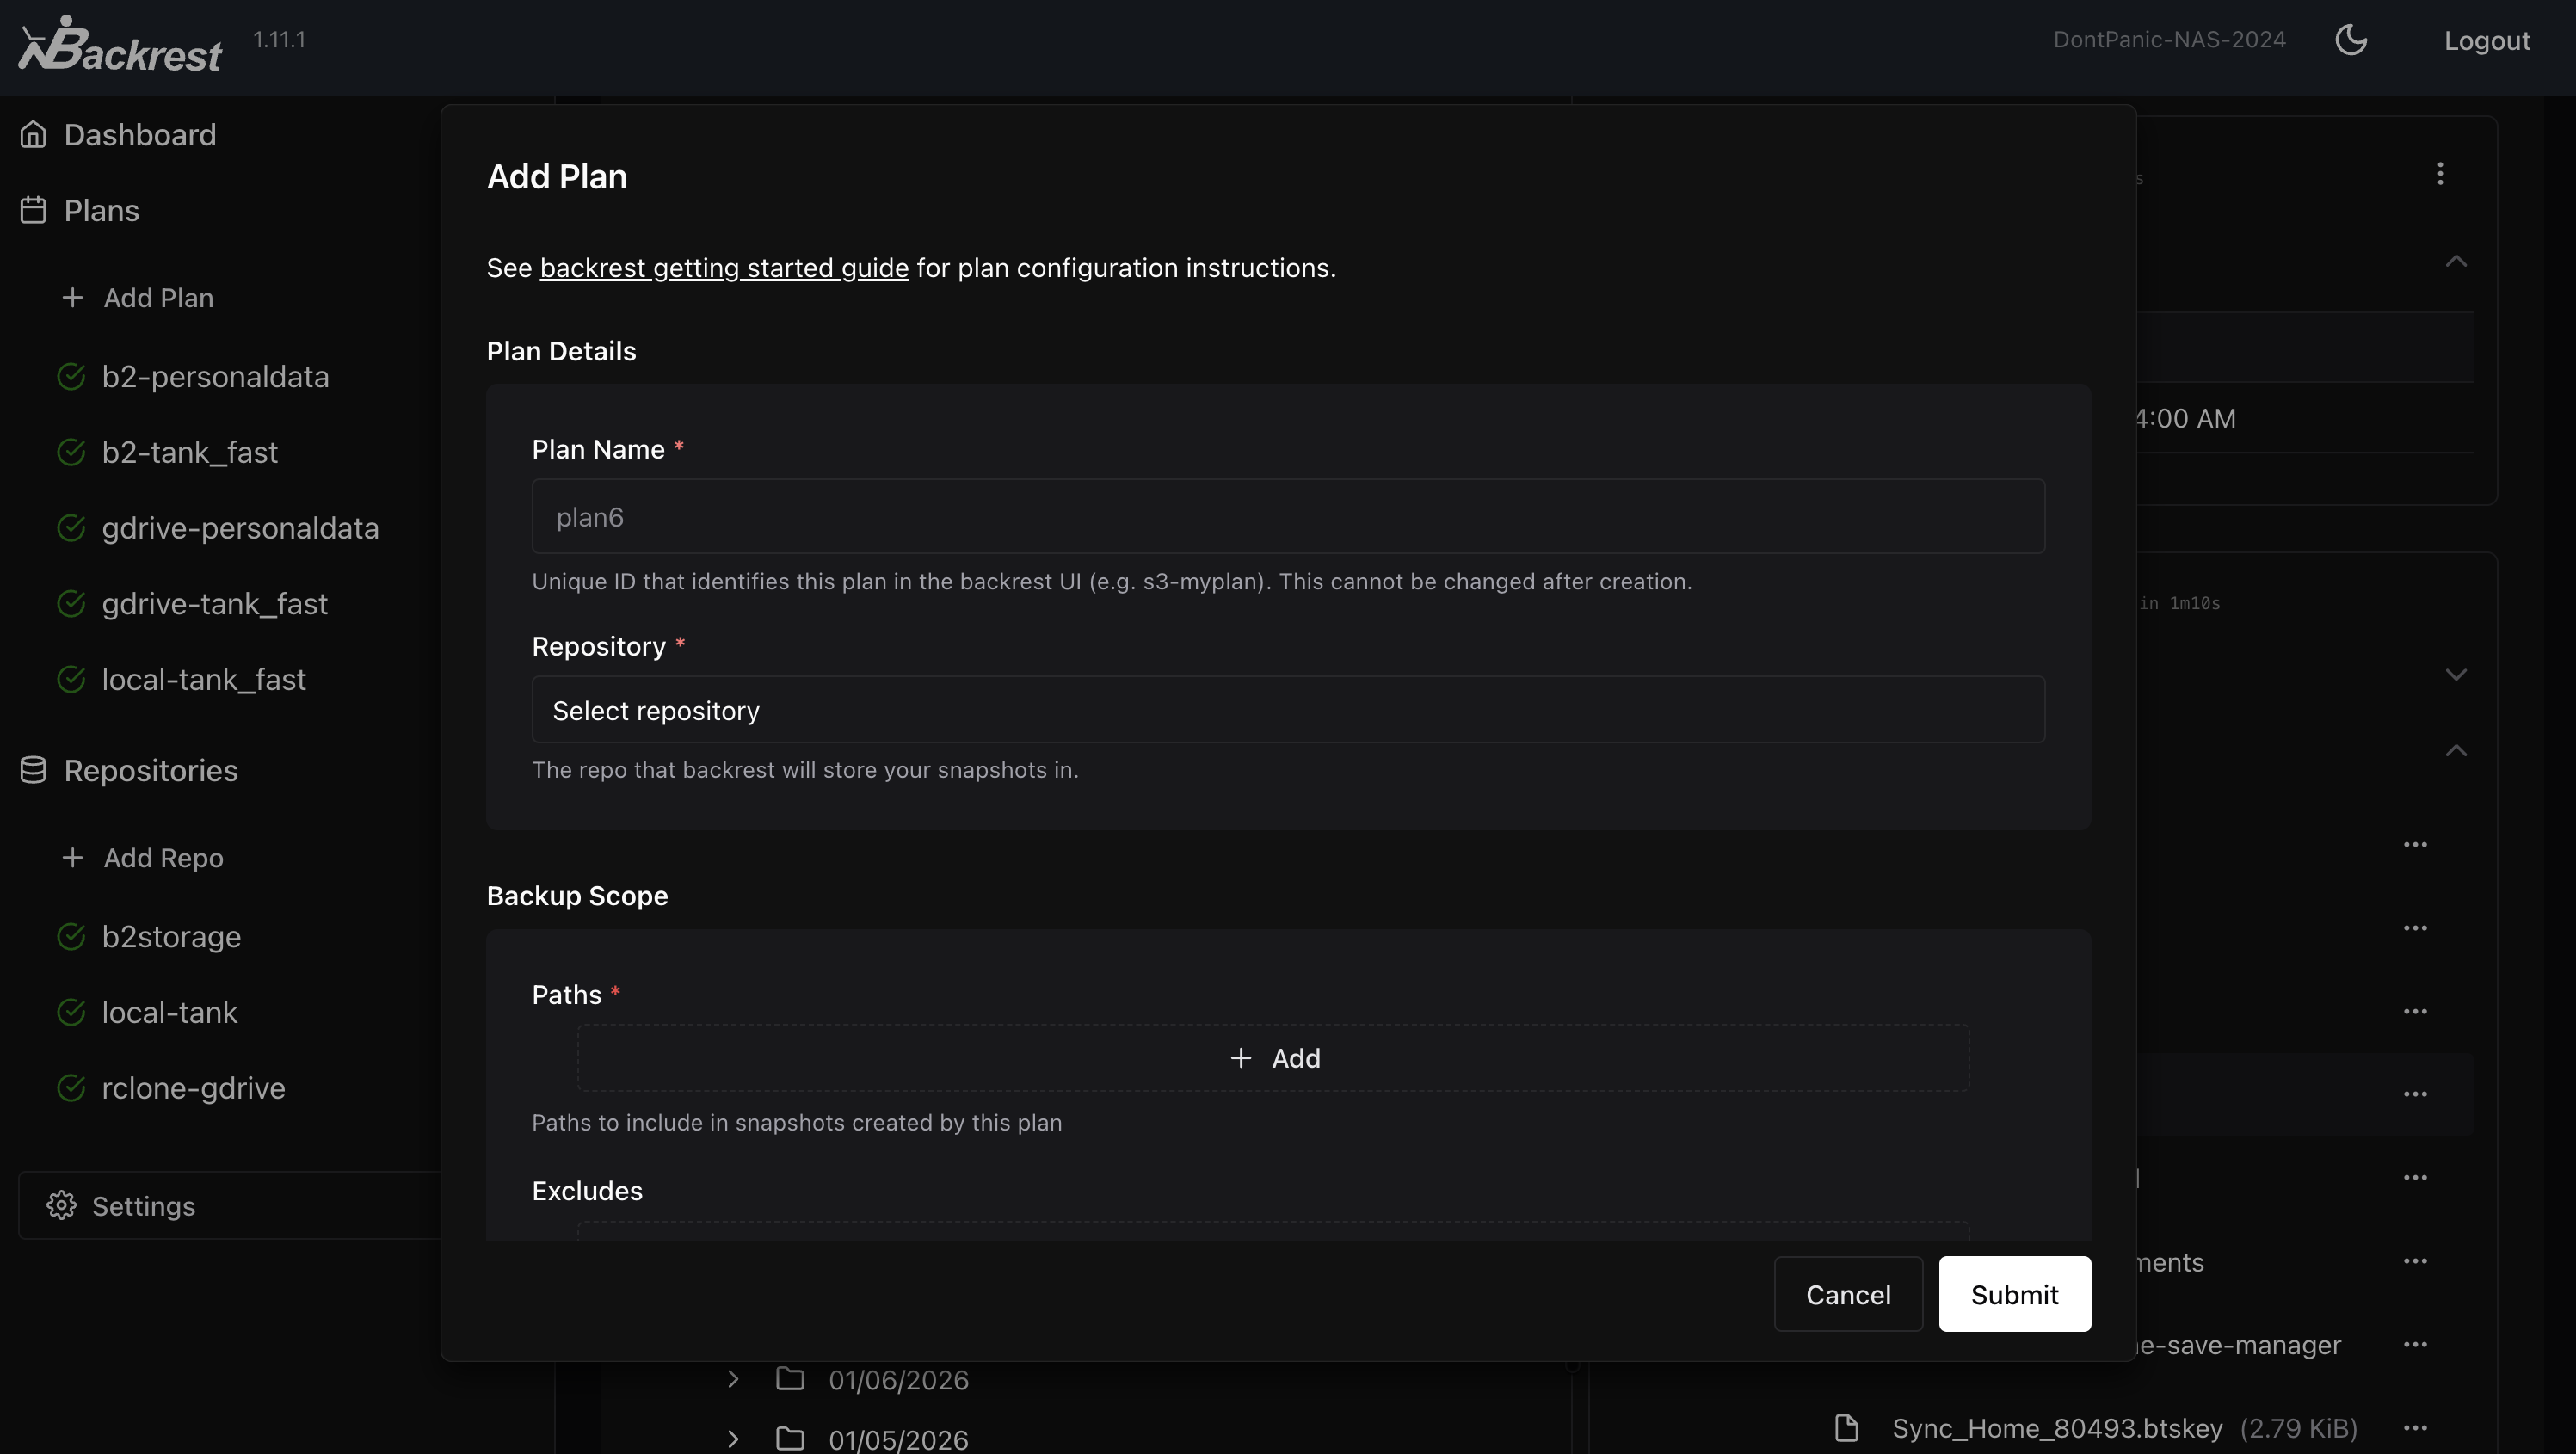
Backrest is a web-accessible backup solution built on top of restic. Backrest provides a WebUI which wraps the restic CLI and makes it easy to create repos, browse snapshots, and restore files. Additionally, Backrest can run in the background and take an opinionated approach to scheduling snapshots and orchestrating repo health operations.
By building on restic, Backrest leverages its mature, fast, reliable, and secure backup capabilities while adding an intuitive interface.
Built with Go, Backrest is distributed as a standalone, lightweight binary with restic as its sole dependency. It can securely create new repositories or manage existing ones. Once storage is configured, the WebUI handles most operations, while still allowing direct access to the powerful restic CLI for advanced operations when needed.
- Web Interface: Access locally or remotely (perfect for NAS deployments)
- Multi-Platform Support:
- Linux
- macOS
- Windows
- FreeBSD
- Docker
- Backup Management:
- Import existing restic repositories
- Cron-scheduled backups and maintenance (e.g. prune, check, forget, etc)
- Browse and restore files from snapshots
- Configurable notifications (Discord, Slack, Shoutrrr, Gotify, Healthchecks)
- Pre/post backup command hooks to execute shell scripts
- Storage Options:
- Compatible with rclone remotes
- Supports all restic storage backends (S3, B2, Azure, GCS, local, SFTP, and all rclone remotes)
Backrest is packaged as a single executable. It runs directly on Linux, macOS, and Windows. restic is downloaded automatically on first run.
Once installed, access Backrest at http://localhost:9898 (default port). First-time setup will prompt for username and password creation.
Note
To change the default port, set the BACKREST_PORT environment variable (e.g., BACKREST_PORT=0.0.0.0:9898 to listen on all interfaces). The install script accepts --allow-remote-access as a shortcut for this.
Backrest will use your system's installed version of restic if it's available and compatible. If not, Backrest will download and install a suitable version in its data directory, keeping it updated. To use a specific restic binary, set the BACKREST_RESTIC_COMMAND environment variable to the desired path.
The install script downloads the latest release, drops the binary into /usr/local/bin, and sets up the appropriate auto-start integration (systemd or OpenRC on Linux; launchd on macOS):
curl -fsSL https://raw.githubusercontent.com/garethgeorge/backrest/main/install.sh | bashFlags go after --:
# Bind to all interfaces (default: 127.0.0.1:9898)
curl -fsSL https://raw.githubusercontent.com/garethgeorge/backrest/main/install.sh | bash -s -- --allow-remote-access

# Uninstall (removes service, autostart entry, and /usr/local/bin/backrest)
curl -fsSL https://raw.githubusercontent.com/garethgeorge/backrest/main/install.sh | bash -s -- --uninstall
The service runs as your user by default (so config and data live under your $HOME). To install as root instead, pass --root. After install, access Backrest at http://localhost:9898.
Tip
Review install.sh before piping it into a shell. You can also clone the repo and run ./install.sh locally; it accepts the same flags.
brew tap garethgeorge/homebrew-backrest-tap
brew install backrest
brew services start backrest
Note
You may need to grant Full Disk Access to Backrest. Go to System Preferences > Security & Privacy > Privacy > Full Disk Access and add /usr/local/bin/backrest.
Backrest on AUR is third-party (not maintained by the Backrest project) and tweaks the systemd unit; see the AUR service file for details.
paru -Sy backrest  # or: yay -Sy backrest
sudo systemctl enable --now backrest@$USER.service
Image: ghcr.io/garethgeorge/backrest (also on Docker Hub).
- Includes rclone and common Unix utilities
- For a minimal image, use
ghcr.io/garethgeorge/backrest:scratch
version: "3.8"
services:
  backrest:
    image: ghcr.io/garethgeorge/backrest:latest
    container_name: backrest
    hostname: backrest
    volumes:
      - ./backrest/data:/data
      - ./backrest/config:/config
      - ./backrest/cache:/cache
      - ./backrest/tmp:/tmp
      - ./backrest/rclone:/root/.config/rclone # Mount for rclone config (needed when using rclone remotes)
      - /path/to/backup/data:/userdata  # Mount local paths to backup
      - /path/to/local/repos:/repos     # Mount local repos (optional for remote storage)
    environment:
      - BACKREST_DATA=/data
      - BACKREST_CONFIG=/config/config.json
      - XDG_CACHE_HOME=/cache
      - TMPDIR=/tmp
      - TZ=America/Los_Angeles
    ports:
      - "9898:9898"
    restart: unless-stopped
Download the Windows installer for your architecture from the releases page. The installer, named Backrest-setup-[arch].exe, places Backrest and a GUI tray application in %localappdata%\Programs\Backrest\. The tray application, set to start on login, monitors Backrest.
Tip
To override the default port before installation, set a user environment variable named BACKREST_PORT. On Windows 10+, navigate to Settings > About > Advanced system settings > Environment Variables. Under "User variables", create a new variable BACKREST_PORT with the value 127.0.0.1:port (e.g. 127.0.0.1:8080). If changing post-installation, re-run the installer to update shortcuts with the new port.
| Variable | Description | Default |
|---|---|---|
BACKREST_PORT |
Port to bind to | 127.0.0.1:9898 (or 0.0.0.0:9898 for the docker images) |
BACKREST_CONFIG |
Path to config file | $HOME/.config/backrest/config.json(or, if $XDG_CONFIG_HOME is set, $XDG_CONFIG_HOME/backrest/config.json) |
BACKREST_DATA |
Path to the data directory | $HOME/.local/share/backrest(or, if $XDG_DATA_HOME is set, $XDG_DATA_HOME/backrest) |
BACKREST_RESTIC_COMMAND |
Path to restic binary | Defaults to a Backrest managed version of restic at $XDG_DATA_HOME/backrest/restic-x.x.x |
XDG_CACHE_HOME |
Path to the cache directory |
| Variable | Description | Default |
|---|---|---|
BACKREST_PORT |
Port to bind to | 127.0.0.1:9898 |
BACKREST_CONFIG |
Path to config file | %appdata%\backrest\config.json |
BACKREST_DATA |
Path to the data directory | %appdata%\backrest\data |
BACKREST_RESTIC_COMMAND |
Path to restic binary | Defaults to a Backrest managed version of restic in C:\Program Files\restic\restic-x.x.x |
XDG_CACHE_HOME |
Path to the cache directory |
Contributions are welcome! See the issues or feel free to open a new issue to discuss a project. Beyond the core codebase, contributions to documentation, cookbooks, and testing are always welcome.
All build dependencies are defined in shell.nix and can be activated automatically using Nix and direnv.
- Install Nix and direnv
- Hook direnv into your shell (e.g.
eval "$(direnv hook bash)"in your.bashrc) - Clone the repo and
cdinto it - Run
direnv allowto trust the.envrc— all dependencies (Go, Node.js, pnpm, protoc, buf, etc.) will be available in your shell automatically
If you prefer not to use Nix, install the following manually:
(Optional) To edit protobuf definitions:
apt install -y protobuf-compiler
go install google.golang.org/grpc/cmd/protoc-gen-go-grpc@latest
go install github.com/bufbuild/buf/cmd/buf@latest
go install google.golang.org/protobuf/cmd/protoc-gen-go@latest
go install connectrpc.com/connect/cmd/protoc-gen-connect-go@latest
npm install -g @bufbuild/protoc-gen-es
(cd webui && pnpm i && pnpm run build)
(cd cmd/backrest && go build .)The dev container uses Nix and direnv to provide all dependencies. When the container starts, direnv allow runs automatically so the Nix shell is activated in every terminal.
- Make sure Docker and VSCode with the Dev Containers extension is installed
- Clone this repository
- Open this folder in VSCode
- When prompted, click on
Open in Containerbutton, or run> Dev Containers: Rebuild and Reopen in Containerscommand - When the container is started, go to
Run and Debug, chooseDebug Backrest (backend+frontend)and run it
Note
Provided launch configuration has hot reload for the typescript frontend.
Translations are stored in ./webui/messages and are generated using inlang. Machine translations can be updated by running npx @inlang/cli machine translate --project ./project.inlang.
Text is translated on a best-effort basis and is not guaranteed to be accurate. If you find any translations that are incorrect, please submit a pull request to fix them. Contributions here are greatly appreciated!