Anyone younger than age 25 or 30 probably doesn't remember much about the chemical-photography days thanks to the proliferation of digital technology. Prior to digital cameras, a Polaroid camera was the only way to get an instant picture, but those prints cost several times that of a typical photo print. The biggest downside to traditional film was that you always had to wait a few days for processing. Prior to digital cameras, you could stand out in front of the Fotomat singing, "Someday, my prints will come." You younger folks can just be glad you don't know what a Fotomat is.

Estes' first rocketry camera, the Camroc as it appeared in their 1970 catalog. Very bad things would happen if that second stage motor didn't ignite. 
The "Sensational" AstroCam 110 Aerial Camera makes its debut as Estes' feature product for 1979. That's a lot of aerial imaging technology for $15.00 in that period! |

The box for the original AstroCam 110 had a rainbow at the border to emphasize the brand-new use of color film. The previous Estes still-camera, the Camroc, only took black-and-white photos. |
While pursuing my rocketry and model building hobbies, I developed my own photography skills, eventually building a darkroom in our basement where I developed my own film and made my own prints.
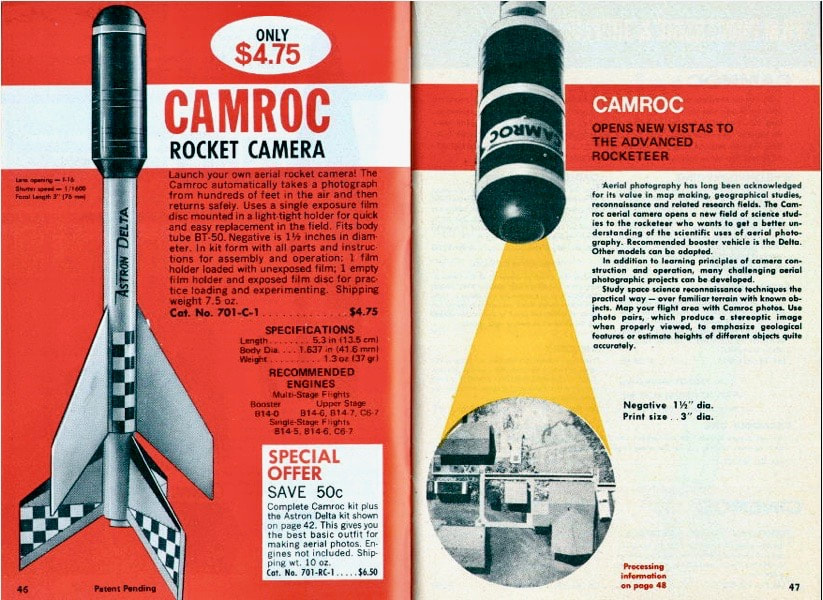
I was very interested in combining rocketry and photography by taking photos from my own rocket. In the early 1970's when I began in rocketry, Estes Industries made their Camroc, which could take one round black-and-white photo per flight. Or, you could buy the Cineroc, which could take a semi-slow motion movie of a rocket flight with Super-8 film!

The Beta Series (second release) parts page from the instructions. The mirror housing was pre-assembled, and lens was installed. You had to do this yourself for the original release from 1979-1992. |
Estes debuted the Camroc in 1965, giving it a number of pages in the catalog. Its design required the use of a customized film format; a single 1.5-inch (3.8 cm) round disc negative had to be handled by the rocketeer in darkroom conditions. |
Film processing of the round film negative, in a lab run by Estes, was also done to push film speed even faster; the photography term "push" means to either leave the film in the developing tank longer than standard recommendations, or to increase temperature of the developing solution to hasten the reaction rate. This darkens the negative, or lightens the final print. "F-stop" was a designation for your lens aperture opening; a smaller F-stop (smaller hole, but larger number) gave better depth-of-field (sharper focus for objects near and far), but it required more light or a higher-speed film. "Pushing a stop" meant increasing film speed chemically to simulate opening the F-stop to the next larger setting while maintaining depth-of-field. Estes pushed their film a couple stops during processing.

Advancing the AstroCam 110 film was a two-step process. You had to hold the Film Release... |

...while turning the Advance knob. Hopefully, you did it right so the film would advance properly to the next frame. The "Safety Lock" was a light block over the shutter that had to be closed except when flying the camera. |
If this all sounds confusing, you can thank your lucky stars that digital cameras nowadays generally take care of these technical aspects for you.
The 1.5-inch circle "Astropan-400" film disc would be held in a can-like holder. Film had to be loaded into the holder by the rocketeer in total darkness. Estes offered pre-loaded film holders, but they obviously cost more. Four pre-loaded film holders cost about half the price of the camera itself.
|
A string pinched between the rocket body tube and camera nose cone shoulder acted as the shutter trigger. A long-delay engine would hopefully assure the rocket was pointing straight down at parachute ejection (the lens was centered on the rocket's long axis with an acrylic window at the very tip of the nose cone facing in the rocket's direction of travel). Shorter delay times might give you a shot of the horizon; if delay was too short, you'd get a sky-shot. |

The Lookdown-Astrocam modifications to the camera, along with a custom-made BT-55 booster. This rocket-camera combo allowed the rocket to appear in the photo, unlike the standard Astrocam 110 configuration. |
By 1975, the Camroc cost about nine bucks. Today, this doesn't sound like much, but this was about half the cost of the big 1/100 scale Saturn V. So the Camroc was not exactly cheap (the Cineroc movie camera cost a few bucks more than the Saturn V, so it was a pretty high-priced item!).
After sending the exposed film discs to Estes for processing, you'd get back a three-inch round print. The ratio of negative size to finished print meant that the quality of the black-and-white image wasn't bad at all. The plastic camera lens wasn't exactly high-end, however, so it wasn't like you could get surveillance-quality images out of a Camroc. Still, they looked pretty good if you didn't get too much blurring from the rocket's pitchover at parachute ejection.

An early AstroCam 110 flight in stock configuration other than a custom paint job for the booster. My RSO is doing a preflight inspection. He had four years of experience by 1988. |

It happens! Experimenting with an alternate triggering mechanism didn't turn out well. Had the camera not been mounted backwards with the nose adapter, it would have been irreparable. As it was, the camera was split open and the film door latch was broken off. |
A Camroc was a bit out of my price range during my paperboy days, but circa 1976, I won the Estes Design of the Month contest for the first time. That year, they raised the prize from $50 to $75, so I thought I had hit the big-time! With that generous merchandise certificate, I eagerly perused my 1976 Estes catalog to order both a Camroc and Cineroc. To my absolute horror, both cameras had been quietly discontinued! The 1975 catalog was the last place they appeared! I ordered up a 1/100 Saturn V, 1/9 "Maxi Brute" Honest John, the new Space Shuttle, and a few other now-classics with my winnings.

My Lookdown-AstroCam 110, or "AstroCam-R" as I referred to it. To fly the camera like this, I securely wrapped black electrical tape around the camera's nose to secure it to the body tube adapter.
I bought a very small, inexpensive 110 camera (K-Mart brand "Focal Flip-11") with the intent of putting it in a rocket. About the time I'd perfected a cam system that would actuate the shutter at parachute ejection, I saw the cover of the 1979 Estes catalog.
For 1979, Estes debuted a brand-new camera designed to fly on a rocket--the AstroCam 110! Their in-house engineer, Mike Dorffler, who had designed the Cineroc movie camera for 1970, is credited with creating the AstroCam 110.

Compare two photos taken during consecutive flights. I was trying to get my house in the picture. |

My house was just to the right of the photo, barely out of frame behind the rocket. |
Estes did their best to address many issues with the Camroc by utilizing a fairly new consumer film format, the Kodak 110 film cartridge, which debuted in 1972. By the mid-1970's, the film format had become popular for consumer snapshot photography.

A typical AstroCam-R shot flying on a C6-3 motor. Note the light leak at the right side of the photo.
All these scanned photos had minor color enhancement done with no sharpening. They're all presented at or very near their original photo borders; no cropping was done. |
By embracing a common film format, Estes could eventually retire its film sales and processing service. The format also facilitated a change from black and white-only to full color. Film handling was greatly simplified for the rocketeer, as the AstroCam 110 could now hold many exposures and it was a much less complicated matter to advance the film for another flight without the need for a portable darkroom, or at very least, having to disassemble the camera to install a new film holder. |
Unlike the Camroc, which fit a BT-50 body tube, Estes designed the Astrocam 110 to fit an uncommon body tube size, BT-56. This was done to assure the rocketeer would stick with the included booster. Catalog copy said that other launch vehicles weren't recommended. The unstated secret was that the BT-56 body tube came from the Centuri inventory. Centuri started out as Estes' chief competitor until both companies came under ownership by Damon Corp in the 1970's.
|
The Astrocam 110's Delta II booster rocket had a plastic fin unit, probably with the intention to prevent spin-blurring, which would likely occur if a builder glued fins on a rocket with the slightest misalignment. Root edges on the fin unit were a tad short for my liking, as I had some fins pop off a few times during landings where I couldn't catch the rocket, or when the parachute shredded thanks to that long seven-second delay. |

Another shot of the church building near my house at the time in a southern suburb area of Salt Lake City. Circa 1990. Note the light leak at the left side of the photo. This was fixed with some thin strips of black electrical tape covering the joints of the film access door. |
The camera was pretty easy to build. I was an experienced modeler and had no trouble. The instructions were well-written as was typical for Estes kits. Included were warnings to be extra-careful with glue around the lens and mirror. A glob of glue in the wrong place would prove devastating for image quality. I never had trouble with this even though I later worked for the same company that screwed up that mirror on the Hubble Space Telescope.

After some experimentation, I was able to get this picture of my house at the time (left of center in the photo). A C6-3 motor was used. My kids were quite young at the time and a basketball standard, trampoline, swing set, and blue wading pool can be seen in this photo taken in 1993. Thanks to the reverse-view hardware, fins, smoke trail, and flaming debris from the motor's ejection charge are also visible in the photo.
The original Camroc had no mirror since the customized film format was designed specifically for the camera body. On the Astrocam 110, a right-angle mirror had to be used to accommodate the design of the film cartridge. Like the Camroc, the camera shot towards the front of the rocket even though the film plane was perpendicular.

A ground shot of my house and back yard from my original, unmodified AstroCam 110. I took this holding the camera in my hand as still as I could to compare general photo quality between a static ground photo and the aerial photos I was getting. Even with the limitations of the film format, picture quality was pretty good for a camera you built yourself! |
When processing the film, a step in the Astrocam 110 instructions reminded the rocketeer to write the statement, "Pictures taken with a mirror. Reverse negative to make prints" on the instructions for processing. In my experience, all but the cheapest photo processors followed these instructions. If you forgot to do this, your photos would be reversed. You'd have to hold them up to a mirror to view them. |
The downside of this was that the rocket would be traveling downward faster than normal, and the parachute would sometimes fail at ejection. This was the scenario that caused my fins to break off.
A C6-5 might give you a horizon shot. You could almost bank on a sky-shot if you used a C6-3 engine.

Top: Beta Series AstroCam that was modified during construction with built-in reverse-view ("AstroCam-X"). "Look-Down" adapters were no longer required to fly the camera when built this way. |

Top: Beta Series "AstroCam-X" on its booster. Note that the lens faces the rocket so that the rocket and its smoke trail would be visible in photos. |
You had to be pretty attentive when handling the camera. For example, there was a light-block you had to close while cocking the shutter (Estes called it a "Safety Lock"). If you forgot to close the light block before cocking the shutter, you'd expose the film for that frame and lose the shot. I recall that a checklist was a valuable tool for the first dozen or so flights since there were a number of steps involved to advance the film, cock the shutter, and then get the rocket ready for the next flight. It was most helpful to be well-experienced at flying rockets before using any of the rocketry cameras. Along with prepping a rocket launch, there were quite a few things that could go wrong with the payload if one was the least bit inattentive--or inexperienced.

This illustrates the advantage of modifying the camera during construction for Look-Down Mode. At top, a stock camera with reverse view ("-R") adapters. The adapters added quite a bit of weight to the rocket. |

Both AstroCam 110 cameras shown with Delta-II launch vehicles. The bottom booster had a customized paint scheme; the top one was decorated with kit stickers. The Delta II boosters would only fit the base of the AstroCam 110, not the BT-55 adapter. |
I also learned early on that black electrical tape was my friend, and running a few narrow pieces along film access door edges prevented light leaks and fogged film. I also glued a small piece of clear plastic to the inside of the film access door's exposure number window. Since the camera often landed in the dirt, this kept the inside of the camera dust-free.
|
After getting a few good shots of you and your launcher, you would wonder what else you could do with an AstroCam 110. The 1986 Estes catalog had an Astrocam 110 photo looking downward, which included the rocket and its smoke trail in the image. Articles in Estes' Model Rocket News included such pictures as well. I recall that Art Nestor of Zelienople, PA wrote a number of enjoyable articles in those days including a reverse-Astocam 110 article and photos.
I thought it would be really cool to get pictures of my own house from an Astrocam 110, and also get the rocket booster and its smoke trail in the picture. Armed with new information on how to do that, I created my own Reverse-Astrocam 110, or Astrocam-R hardware. A BT-55 adapter with centering tube held the Astrocam 110 nose cone securely, and a short piece of BT-55 and a nose cone fit over the Astrocam 110's body tube adapter. The trigger string was lengthened, and ran through the normal trigger slot and down to the new booster-camera adapter.The Astrocam 110 was fastened to these new adapters with electrical tape, which worked very well. I had to use a BT-55 based booster for this configuration since the new camera adapter was that size. |

An early shot from the AstroCam-X (camera modified by me during its construction) shows more of the rocket in the photo thanks to the mirror angle modification. Visible near top left is one of my boys pushing the launch button. My range box is on the curb and the launcher can be seen just below. Note that the cloud of smoke from liftoff has been blown slightly off the launcher by a gentle wind. I believe a B6-2 was used to boost the rocket for this low-altitude photo |
When I built the booster, I was extra-careful to be sure the fins were glued on straight. Too much roll caused by crooked fins during boost would blur the photos.
After taking a few photos, I learned that the reversed orientation tended to cause double-exposures. When the parachute opened, the shutter would "bounce" as the rocket quickly decelerated. The original shutter movement was designed to stay securely closed during recovery deployment, but flipping it 180 degrees undid this thoughtful design consideration. As I recall, a longer, springier parachute shock cord largely eliminated this unanticipated phenomenon.

AstroCam-X, C6-3 motor. Note the yellow "Beta" Delta-II booster. |

AstroCam-X shot on a B motor from the same location. This photo illustrates what happens when the film doesn't advance properly. 110 film had frames and exposure numbers pre-exposed to help identify exposures on the developed negatives. Notice the frame and exposure number at far right. A tab on the film release is supposed to catch the hole in the top-right corner. You just had to be careful when advancing the film; operation wasn't nearly as fool-proof as a regular 110 camera. |
The AstroCam 110 apparently sold well enough that it was in the annual Estes catalog from 1979 through 1991. In 1992, it wasn't there. During that off-year, Estes sold down previous stock and tweaked the camera just a bit. For 1993, as a part of the new Beta series lineup (intermediate skill level), the Astrocam 110 was easier to build. A new lens was pre-mounted and the mirror housing was assembled with mirror inside. The risk of a sloppy builder fouling the optics with glue was reduced. A new, higher-grade lens allowed the camera to accept ASA-200 film instead of grainier ASA-400 that the AstroCam 110 required before. ASA 200 film was much easier to find in those days in addition to having better resolution.
I launched over a hundred AstroCam 110 flights, as I recall. I found that when taking a whole roll of 24-exposure film, you would usually only get maybe 2-4 shots that were really good. Some shots would be ruined by your own technical errors, some would be sky-shots, and others were just victim to random chance. That was actually a big part of the fun of flying the AstroCam 110. You really didn't know what was going to happen during a given flight.

A sky-shot. In many pictures, flaming motor residue can be seen coming from the engine nozzle as the ejection charge fires. |

The sun is just behind the rocket in this sky-shot. Note how the smoke trail is backlit. |
I considered launching my Astrocam with a two-stage booster. Skittish from nearly destroying my AstroCam, I decided to build a "boilerplate" to try out with the two-stage booster I'd built. My dummy AstroCam was the same size and weight of the real AstroCam with film installed. The lens housing was simulated with a balsa block. I made a successful flight or two, but didn't end up making any two-stage flights. I lost a few "D" powered rockets thanks to wind at those altitudes and decided the extra height from a two-stage flight wasn't worth risking the AstroCam 110 camera and film.

Another sky-shot with the sun in-frame. When purchasing the second camera, a new Beta-Series unit in 1993, I decided to modify it since I flew my Astrocam 110 exclusively in the reverse, look-down flight mode. I managed to cut off part of the base of the nose cone and made it fit on what normally would have been the tube adapter part of the camera. |

A double-exposure with an image of streets superimposed with the parachute snapping open. This was a glitch that could happen when using the AstroCam-110 in reverse/look-down mode. |
The part I’d cut from the base of the nose cone attached to the front end of the camera like normal, but I attached that piece directly to the tube adapter part. These modifications simply turned the camera 180 degrees in between the nose cone and tube adapter.
Another item I modified was the mirror angle. Decreasing the angle just a tad between mirror and camera body allowed more of the booster rocket to be seen in the photos, the fins in particular. As I recall, I had to split the mirror housing apart (this was a pre-assembled part of the Beta Series (1993) version). I trimmed off the inner mirror mount piece and glued in another made of a thin piece of sheet styrene with an angle about three degrees tighter than stock.

A horizon shot of suburbia as far as the eye can see. There is no mistaking that this photo was taken from a model rocket. Note the launch lugs visible. One interesting phenomenon I noticed on many Astrocam-110 prints was scratches on the negatives (bluish horizontal line over the rocket in this photo). Swapping the emulsion side on the processing equipment probably made it more susceptible to damage as it wound through the machinery.
I did note an increased tendency for double-exposures with the AstroCam-X. The extra weight of the aforementioned “R” adapters had provided more of a G-force damping effect with my original reverse-setup. The shutter on the much lighter reversed camera was more likely to bounce open a second time with parachute deployment. Wrapping the parachute a little more tightly so it would open slower ("reefing") fixed this issue.

The AstroCam-R on this rocket is a dummy-boilerplate unit to be sure my staging techniques were sound before risking my actual camera. The white launch deflector was a piece of ceramic tile, which worked great! |

The flight was spectacular and staging was successful, but in the end, I didn't end up making any two-stage flights with a real AstroCam 110. Maybe some day! |
Snapping pictures straight down at my launch field got a little boring after a while. Since my house at the time was at the edge of my flying field, I thought it might be fun to try getting shots of the house from the rocket.

1993 SELFIE: A B-motor puts the AstroCam-X to low altitude on my backup (older) booster. Having that backup was handy when a launch lug or fin would pop off. One of my kids (Can't remember or tell which one!) can be seen launching the rocket. |
Targeting something on the ground could get tricky if trees or buildings that might eat your rocket were involved. Of course this risk always made the flights more exciting. Eventually, I got comfortable enough predicting where my Astrocam 110 was going to land that I could launch it from my back yard to get a picture of the house on a B motor. Fortunately, a large field in the form of undeveloped land resided behind my house at the time. It made a very convenient flight range. |
In 2004, the AstroCam 110 starter set received a big makeover including a name-change. Now dubbed the "SnapShot," the pre-assembled camera included a new RTF booster, launcher, engines, and even came with a roll of 110 film. A heavier booster with an engine lock-ring facilitated a change to C6-5 engines. I recall seeing this set sold at Wal-Mart.
In 2005, the AstroCam 110 came back as a "Classic Kit" in the E2X (easy to assemble) product line and even rated a picture on the catalog cover for the first time since 1979. It boasted a "newly designed shutter release that makes it even easier to use." As an E2X kit, the camera was all pre-assembled but the rocket required simple assembly with most of the construction focused on building the engine mount and gluing it to the body tube along with the plastic fin unit. The Delta II booster got a new, blue wrap that remains the final incarnation of the AstroCam/Delta II combination.
|
The other significant product debut in 2005 was the Oracle digital video camera and rocket. For the first time since 1975, Estes sold both still and motion-picture cameras. Since both the AstroCam and Snapshot were still in the catalog in 2005 and 2006, there were technically three camera rockets available during that period. |

The AstroCam 110 returns, scoring a spot on the 2004 Estes catalog cover. As an E2X kit, the camera was pre-assembled. |
Digital video technology was advancing quickly in that period, and the Oracle got a new sibling in the Estes catalog in 2007. The new AstroVision could take both movies and still digital photos. The new camera doubled resolution at 640x480 pixels, equivalent to standard VGA. For reference, you could get an IBM PS/2 computer in 1987 with then-new VGA graphics. Cost for that would have been well over a hundred times what you’d pay for an Estes AstroVision, and that did not include the capability to take or display photographs. Digital video, and digital photography for that matter, was still a few years away.
The AstroVision camera/rocket combo was smaller than the Oracle with a 1.35” diameter airframe (same as the AstroCam 110’s Delta II plus a body wrap). At 3.4 oz, the much lighter rocket could be launched with B or C engines. Cost was significantly less than the Oracle at $75 listed in the Estes catalog.
If this was too expensive for the rocketeer, the Astrocam 110 and SnapShot were still available! By this time, digital photography was prevalent. Almost nobody was still using film cameras. Smartphones were on the horizon. The end of the AstroCam was near!

My youngest boy can be seen on the lounge (he's wearing red slipper-socks!) between the launch lugs. He was under the weather on this day circa 1993. A Cox Saturn V can be seen on a red launcher just left of the patio. Low altitude flight, B-motor. |
For 2008, the AstroVision and Oracle rocket video cameras still shared the Estes catalog. The AstroCam 110 and SnapShot were still in the catalog as well—at least in the catalog index. There was no picture or product information for the AstroCam 110 on the page indicated. So the AstroCam 110 itself made a mysterious exit from the Estes product line, although it was still there in the form of the SnapShot starter set. |
However, the economic recession of that period in the USA created chaos for many companies. Estes did not publish a full catalog for 2009. They were acquired by Hobbico, and simplified their product offerings, jettisoning everything but rockets, launchers, and engines for the 2010 catalog.
The most complex electronic products in the catalog between 2010 and 2012 were launch controllers. Estes returned to its roots, classic model rocketry. About the only payload available was a little plastic guy with his own parachute that came with the Freefall rocket, an E2X kit.
Estes began to diversify its products in 2013, when R/C helicopters and an altimeter returned. No rockets with cameras appeared during this time. Estes had a big hit with the Proto-X micro quad copter, proclaimed “the world’s smallest quad copter.” The Kodo wasn’t much bigger, and included a built-in camera. The age of camera drones had arrived!
|
Most everybody walks around these days with a smartphone with a high-resolution digital camera. Low-resolution, choppy video from the Estes Oracle and AstroVision looks quite antiquated compared to the movies that anyone can make today with their mobile device. |

An AstroCam 110 by any other name: The SnapShot RTF rocket starter set came with a launchpad! A beginning rocketeer could learn to fly rockets AND take pictures at the same time! |
Believe it or not, a company called Lomography still makes ASA 200 film in the 110 format! So those readers still interested in taking pictures from an AstroCam 110 can get film. For those who don’t have an AstroCam, but would like to acquire one, later AstroCam 110 and SnapShot starter sets are plentiful on eBay as we post this article and prices are comparable to their original suggested retail. Good luck finding a kit version from the years 1979-91. However, prices and availability will probably be much easier than trying to find an original Camroc!

Another AstroCam-X shot of the house with my backup booster on a B-motor. Note that I took out a section of fence to ease access to the launch range. My range box is visible on the end of the picnic table. Again, the cloud of smoke from liftoff has already blown a couple feet off the launch pad thanks to a gentle breeze. Above the launcher can be seen one of my boys pushing the button. To the left, the yellow dot is a tetherball. At the top left of the patio, you can see a Cox Saturn V and a Cox Saturn 1B, two irreplaceable classics ready for flight.
As a camera, the AstroCam 110 definitely had its limitations. Making it small and low-cost from parts that could be assembled by an average hobbyist was a tall order. It demanded expertise that typical point-and-shoot cameras of the era did not require. But it was pretty amazing that for just a few dollars, one could take photographs from a model rocket! It was a fusion of art and science that many, myself included, could not resist.

A modern view of my old house (above and left of center) taken by Google Maps in the late 2010's. For the record, this photo needed some color-schmoozing as well. Newer houses took the place of my early 1990's launch range in the bottom half of this photo and the trees have grown considerably in a quarter-century. Acquiring this photo represents infrastructure that cost many millions of dollars. An AstroCam 110 and finished photos probably cost less than dinner and a movie.