Contact Sheet prompting is a hot topic, and after trying it out this weekend I can see why everyone is so gassed up.
The idea behind the prompt is to get Nano Banana Pro to output a full contact sheet, with 6-9 key frames telling a cohesive story to a spec. It leans into NBP's reasoning capabilities—NBP is the only model where this can work right now.

The Original Technique
Here is the original post from TechHalla.
Don't just copy+paste his prompt. The real juice here is that you can get detailed camera control across many key frames in a single pass. NBP can generate all of these images individually with good prompting; generating nine images in one pass with character and narrative consistency is the breakthrough here.
Firat Bilal on X is doing great work adapting the technique to better use the reasoning capabilities in NBP. Check out his work.
Adapting it
I wanted to adapt this technique for a fashion-style shoot, where the emphasis is on a single character from many angles in different poses.
It's also a good opportunity to use the node editor for Nano Banana I've been working on. It's still in progress, but if you want to try Node Banana, it's here. In the /examples directory you can find the full workflow for this project, drag it into the node graph and it will set it up exactly as I had it.
The workflow: take a photo of a model, apply a wardrobe change, use an adapted contact sheet prompt to set up the model and camera, extract the images, run I2V in Kling 2.6, and apply ease animations in easypeasyease.
Here's another example using the same workflow.
The Prompts
Initial model prompt:
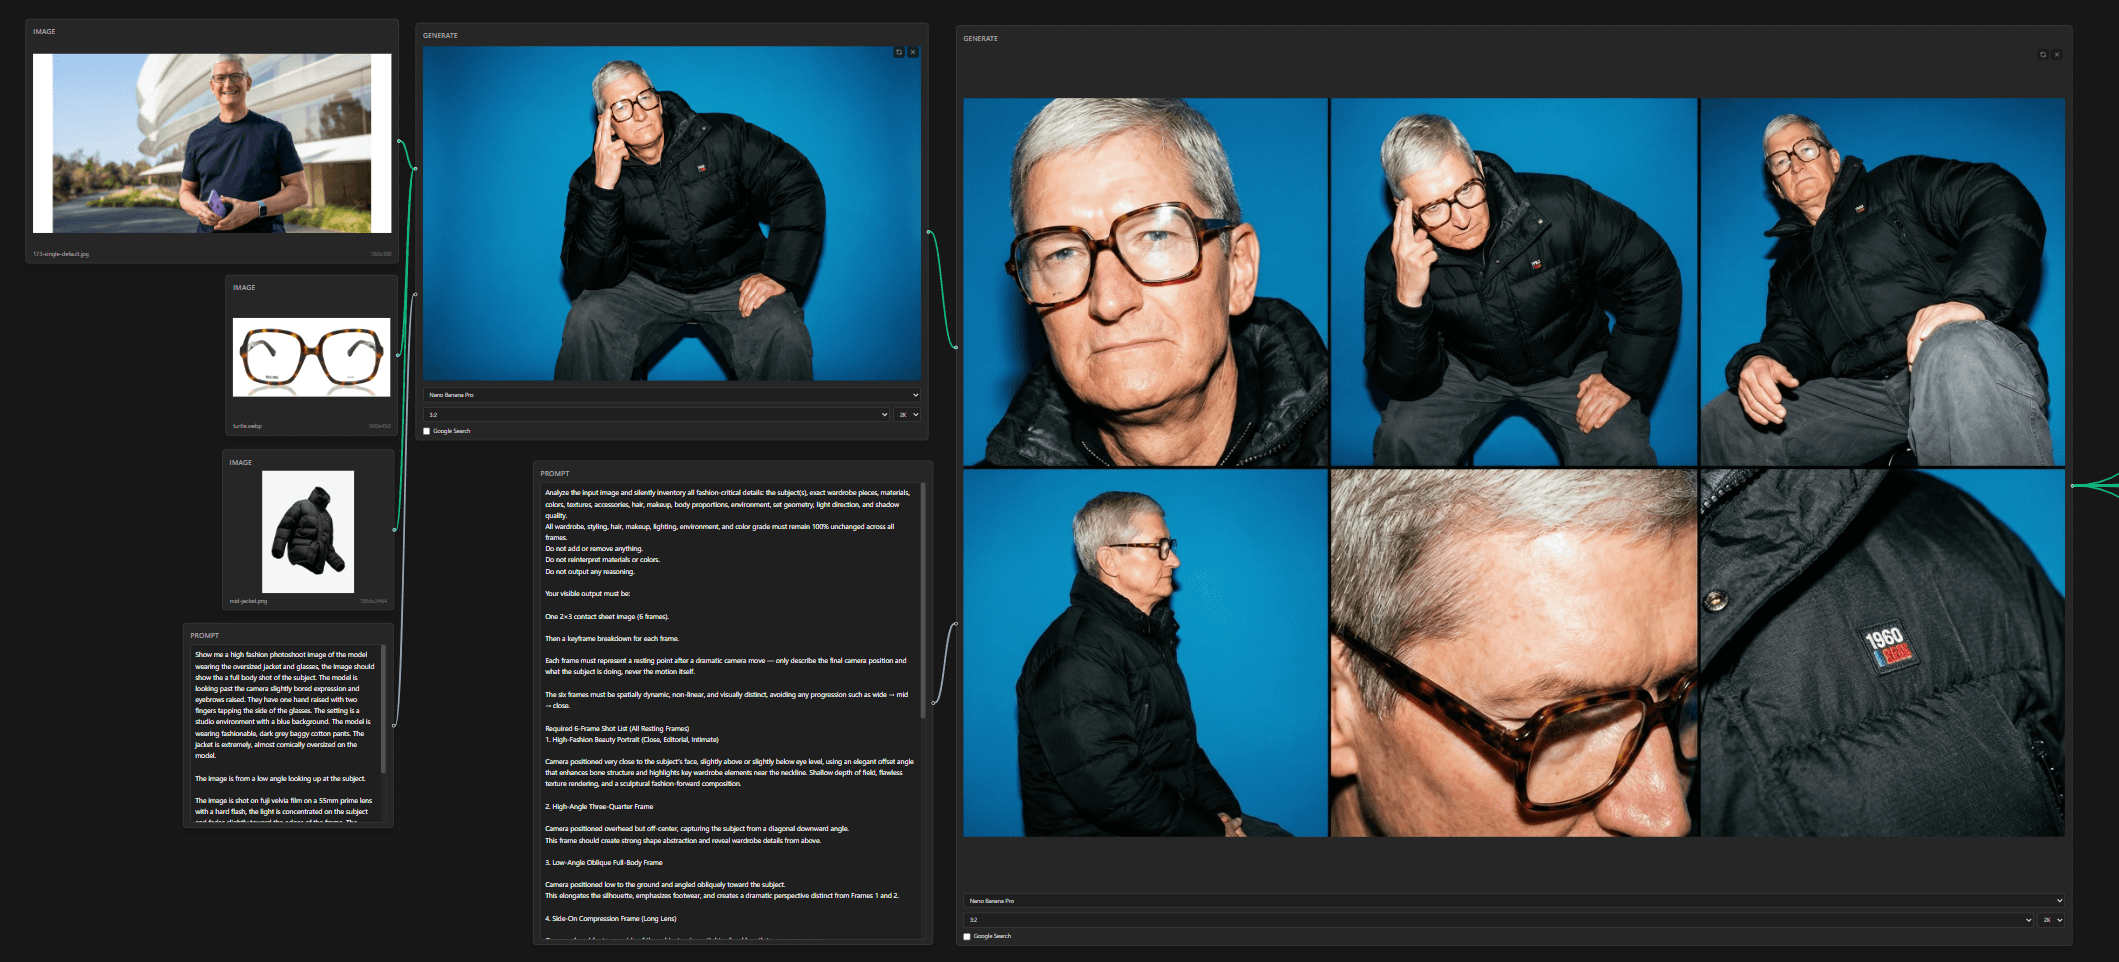
Show me a high fashion photoshoot image of the model wearing the oversized jacket and glasses, the image should show the a full body shot of the subject. The model is looking past the camera slightly bored expression and eyebrows raised. They have one hand raised with two fingers tapping the side of the glasses. The setting is a studio environment with a blue background. The model is wearing fashionable, dark grey baggy cotton pants. The jacket is extremely, almost comically oversized on the model.

The image is from a low angle looking up at the subject.

The image is shot on fuji velvia film on a 55mm prime lens with a hard flash, the light is concentrated on the subject and fades slightly toward the edges of the frame. The image is over exposed showing significant film grain and is oversaturated. The skin appears shiny (almost oily), and there are harsh white reflections on the glasses frames.

3:2 aspect ratio
Contact sheet prompt:
Analyze the input image and silently inventory all fashion-critical details: the subject(s), exact wardrobe pieces, materials, colors, textures, accessories, hair, makeup, body proportions, environment, set geometry, light direction, and shadow quality.

All wardrobe, styling, hair, makeup, lighting, environment, and color grade must remain 100% unchanged across all frames.

Do not add or remove anything. Do not reinterpret materials or colors. Do not output any reasoning.

Perfectly replicate the exact facial features of the model.

Your visible output must be:

One 2×3 contact sheet image (6 frames).

Then a keyframe breakdown for each frame.

Each frame must represent a resting point after a dramatic camera move — only describe the final camera position and what the subject is doing, never the motion itself.

The six frames must be spatially dynamic, non-linear, and visually distinct.

Required 6-Frame Shot List
1. High-Fashion Beauty Portrait (Close, Editorial, Intimate)

Camera positioned very close to the subject's face, slightly above or slightly below eye level, using an elegant offset angle that enhances bone structure and highlights key wardrobe elements near the neckline. Shallow depth of field, flawless texture rendering, and a sculptural fashion-forward composition.

2. High-Angle Three-Quarter Frame

Camera positioned overhead but off-center, capturing the subject from a diagonal downward angle.
This frame should create strong shape abstraction and reveal wardrobe details from above.

3. Low-Angle Oblique Full-Body Frame

Camera positioned low to the ground and angled obliquely toward the subject.
This elongates the silhouette, emphasizes footwear, and creates a dramatic perspective distinct from Frames 1 and 2.

4. Side-On Compression Frame (Long Lens)

Camera placed far to one side of the subject, using a tighter focal length to compress space.
The subject appears in clean profile or near-profile, showcasing garment structure in a flattened, editorial manner.

5. Intimate Close Portrait From an Unexpected Height

Camera positioned very close to the subject's face (or upper torso) but slightly above or below eye level.
The angle should feel fashion-editorial, not conventional — offset, elegant, and expressive.

6. Extreme Detail Frame From a Non-Intuitive Angle

Camera positioned extremely close to a wardrobe detail, accessory, or texture, but from an unusual spatial direction (e.g., from below, from behind, from the side of a neckline).
This must be a striking, abstract, editorial detail frame.

Continuity & Technical Requirements

Maintain perfect wardrobe fidelity in every frame: exact garment type, silhouette, material, color, texture, stitching, accessories, closures, jewelry, shoes, hair, and makeup.

Environment, textures, and lighting must remain consistent.

Depth of field shifts naturally with focal length (deep for distant shots, shallow for close/detail shots).

Photoreal textures and physically plausible light behavior required.

Frames must feel like different camera placements within the same scene, not different scenes.

All keyframes must be the exact same aspect ratio, and exactly 6 keyframes should be output. Maintain the exact visual style in all keyframes, where the image is shot on fuji velvia film with a hard flash, the light is concentrated on the subject and fades slightly toward the edges of the frame. The image is over exposed showing significant film grain and is oversaturated. The skin appears shiny (almost oily), and there are harsh white reflections on the glasses frames.

Output Format
A) 2×3 Contact Sheet Image (Mandatory)
Tips
- Adapt the contact sheet prompt to your needs; mine focuses on dramatic camera movements that suit the ease curve animation style. Spend time with it—it's effectively a 6x prompt.
- Generate the contact sheet at 2k or 4k—this gives the extraction step more detail to work with.
- I used NBP for the extraction because I'm lazy; you can extract these manually and save $1.
- The contact sheet keyframes are just the start; adapt from these with NBP. The calculator, shoe, and grill keyframes were all adaptations from the original set.
- Use Kling 2.6 for the I2V step, it's the best image to video model available IMO. Note that you can only do first+last frame generations on the Kling webUI, if you want to go over the API, use Kling 2.5.
- Video prompting: Go for smooth motion and minimal subject movement. Example: "The camera very slowly and smoothly lowers on a boom. The subject barely moves, and is extremely deliberate and thoughtful in movement."
- Shortening the clips and applying an ease curve can hide hallucinations. I use easypeasyease for stitching, applying ease curves, and adding audio. Best results on Chrome desktop.