CLI for Figma. LLMs already know React and work great with CLIs — this combines both.
echo '<Frame style={{padding: 24, backgroundColor: "#3B82F6", borderRadius: 12}}>
  <Text style={{fontSize: 18, color: "#FFF"}}>Hello Figma</Text>
</Frame>' | figma-use render --stdin
No JSON schemas, no MCP protocol overhead — just JSX that any LLM can write.
📄 Includes SKILL.md — drop-in reference for Claude Code and other AI agents.
MCP servers exchange verbose JSON. CLIs are token-efficient:
# 47 tokens
figma-use create frame --width 400 --height 300 --fill "#FFF" --radius 12 --layout VERTICAL --gap 16
vs MCP JSON request + response: ~200 tokens for the same operation.
For AI agents doing dozens of Figma operations, this adds up fast. If you still prefer MCP, see MCP Server section.
Every LLM has been trained on millions of React components. They can write this without examples:
<Frame style={{ flexDirection: 'column', gap: 16, padding: 24 }}>
  <Text style={{ fontSize: 24, fontWeight: 'bold' }}>Title</Text>
  <Text style={{ fontSize: 14, color: '#666' }}>Description</Text>
</Frame>
The render command takes this JSX and creates real Figma nodes — frames, text, components, auto-layout, the works.
bun install -g @dannote/figma-use

figma-use plugin install  # Install plugin (quit Figma first)
figma-use proxy      # Start proxy server
Open Figma → Plugins → Development → Figma Use
⚠️ Uses Figma's internal multiplayer protocol — ~100x faster than plugin API, but may break if Figma changes it.
# Terminal 1: Start Figma with debug port
figma --remote-debugging-port=9222

# Terminal 2: Start proxy
figma-use proxy
# From stdin
echo '<Frame style={{width: 200, height: 100, backgroundColor: "#FF0000"}} />' | figma-use render --stdin
# From file
figma-use render ./Card.figma.tsx
# With props
figma-use render ./Card.figma.tsx --props '{"title": "Hello"}'Frame, Rectangle, Ellipse, Text, Line, Star, Polygon, Vector, Group
// Layout
flexDirection: 'row' | 'column'
justifyContent: 'flex-start' | 'center' | 'flex-end' | 'space-evenly'
alignItems: 'flex-start' | 'center' | 'flex-end' | 'stretch'
gap: number
padding: number
paddingTop / paddingRight / paddingBottom / paddingLeft: number

// Size & Position
width: number
height: number
x: number
y: number

// Appearance
backgroundColor: string  // hex color
borderColor: string
borderWidth: number
borderRadius: number
opacity: number

// Text
fontSize: number
fontFamily: string
fontWeight: 'normal' | 'bold' | '100'-'900'
color: string
textAlign: 'left' | 'center' | 'right'
defineComponent creates a Figma Component. First usage renders the master, subsequent usages create Instances:
import { defineComponent, Frame, Text } from '@dannote/figma-use/render'

const Card = defineComponent('Card',
  <Frame style={{ padding: 24, backgroundColor: '#FFF', borderRadius: 12 }}>
    <Text style={{ fontSize: 18, color: '#000' }}>Card</Text>
  </Frame>
)

export default () => (
  <Frame style={{ gap: 16, flexDirection: 'row' }}>
    <Card />  {/* Creates Component */}
    <Card />  {/* Creates Instance */}
    <Card />  {/* Creates Instance */}
  </Frame>
)
defineComponentSet creates a Figma ComponentSet with all variant combinations:
import { defineComponentSet, Frame, Text } from '@dannote/figma-use/render'

const Button = defineComponentSet('Button', {
  variant: ['Primary', 'Secondary'] as const,
  size: ['Small', 'Large'] as const,
}, ({ variant, size }) => (
  <Frame style={{
    padding: size === 'Large' ? 16 : 8,
    backgroundColor: variant === 'Primary' ? '#3B82F6' : '#E5E7EB',
    borderRadius: 8,
  }}>
    <Text style={{ color: variant === 'Primary' ? '#FFF' : '#111' }}>
      {variant} {size}
    </Text>
  </Frame>
))

export default () => (
  <Frame style={{ gap: 16, flexDirection: 'column' }}>
    <Button variant="Primary" size="Large" />
    <Button variant="Secondary" size="Small" />
  </Frame>
)
This creates 4 variant components (Primary/Small, Primary/Large, Secondary/Small, Secondary/Large) inside a ComponentSet, plus instances with the requested variants.
Bind colors to Figma variables by name:
import { defineVars, Frame, Text } from '@dannote/figma-use/render'

const colors = defineVars({
  bg: { name: 'Colors/Gray/50', value: '#F8FAFC' },
  text: { name: 'Colors/Gray/900', value: '#0F172A' },
})

export default () => (
  <Frame style={{ backgroundColor: colors.bg }}>
    <Text style={{ color: colors.text }}>Bound to variables</Text>
  </Frame>
)
The value is a fallback. At render time, colors get bound to actual Figma variables by name.
The render command is the fastest way to create complex layouts. For simpler operations or modifications, use direct commands:
figma-use create frame --width 400 --height 300 --fill "#FFF" --radius 12 --layout VERTICAL --gap 16
figma-use create rect --width 100 --height 50 --fill "#FF0000" --radius 8
figma-use create ellipse --width 80 --height 80 --fill "#00FF00"
figma-use create text --text "Hello" --fontSize 24 --fill "#000"
figma-use create line --length 100 --stroke "#000"
figma-use create component --width 200 --height 100
figma-use create instance --component <id>
figma-use set fill <id> "#FF0000"
figma-use set stroke <id> "#000" --weight 2
figma-use set radius <id> 12
figma-use set opacity <id> 0.5
figma-use set text <id> "New text"
figma-use set font <id> --family "Inter" --style "Bold" --size 20
figma-use set layout <id> --mode VERTICAL --gap 12 --padding 16
figma-use set effect <id> --type DROP_SHADOW --radius 10 --color "#00000040"figma-use node get <id> # Get node properties
figma-use node tree # Page structure as readable tree
figma-use node children <id> # List children
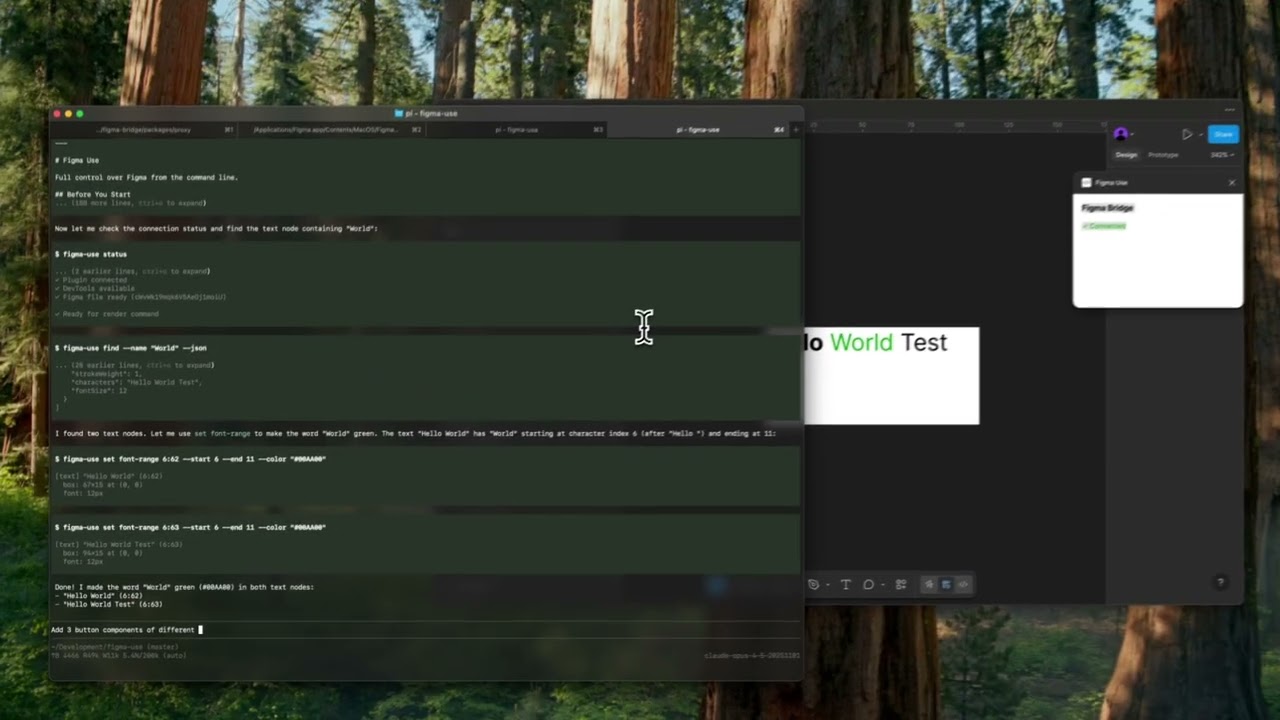
figma-use find --name "Button" # Find by name
figma-use find --type FRAME # Find by type
figma-use selection get # Current selectionfigma-use export node <id> --output design.png
figma-use export screenshot --output viewport.png
figma-use export selection --output selection.pngfigma-use page list
figma-use page set "Page Name"
figma-use viewport zoom-to-fit <ids...>figma-use variable list
figma-use variable create "Primary" --collection <id> --type COLOR --value "#3B82F6"
figma-use style list
figma-use style create-paint "Brand/Primary" --color "#E11D48"figma-use font list # All available fonts
figma-use font list --family Roboto # Filter by family namefigma-use comment list # List file comments
figma-use comment add "Review this" # Add comment
figma-use comment add "Here" --x 200 --y 100 # Comment at position
figma-use comment delete <id> # Delete comment
figma-use version list # Version history
figma-use me # Current user info
figma-use file info # File key and namefigma-use eval "return figma.currentPage.name"
figma-use eval "figma.createRectangle().resize(100, 100)"Human-readable by default:
$ figma-use node tree
[0] frame "Card" (1:23)
    400×300 at (0, 0) | fill: #FFFFFF | layout: col gap=16
  [0] text "Title" (1:24)
      "Hello World" | 24px Inter Bold
Add --json for machine parsing:
figma-use node get <id> --jsonIncludes ready-to-use SKILL.md — a comprehensive reference that teaches AI agents all commands and patterns. Works with Claude Code, Cursor, and any agent that supports skill files.
# Claude Code / pi
mkdir -p ~/.claude/skills/figma-use
cp node_modules/@dannote/figma-use/SKILL.md ~/.claude/skills/figma-use/

# Or download directly
curl -o ~/.claude/skills/figma-use/SKILL.md \
  https://raw.githubusercontent.com/anthropics/figma-use/main/SKILL.md
For simpler setups, add to your project's AGENTS.md:
## Figma

Use `figma-use` CLI. For complex layouts, use `figma-use render --stdin` with JSX.
Run `figma-use --help` for all commands.
If your client only supports MCP, the proxy exposes an endpoint at http://localhost:38451/mcp with 80+ auto-generated tools. Run figma-use mcp for config snippet.
┌─────────────┐     ┌─────────────┐     ┌─────────────┐
│  AI Agent   │────▶│  figma-use  │────▶│   Plugin    │
│             │ CLI │    proxy    │ WS  │             │
└─────────────┘     └──────┬──────┘     └─────────────┘
                           │
                    MCP ───┤ WebSocket (multiplayer)
                           ▼
                    ┌─────────────┐
                    │   Figma     │
                    │   Server    │
                    └─────────────┘
- CLI commands → Plugin API (full Figma access)
- MCP endpoint → Same as CLI, JSON-RPC protocol
- render command → Multiplayer protocol (~100x faster, experimental)
MIT