I was happy with the Remarkable 2 and when the Remarkable Pro came out I decided to go with a second one in order to be able to see two pages at once: one as a reference for reading and one for writing, as one would normally do with paper. Expensive approach, I know.
As an added bonus, the Pro comes with “color”. Very… very bland color. It’s a welcome addition nonetheless. Despite all the limitations, I came to appreciate the Pro for doodling way more than I expected. But when one exports the drawings for PC viewing, the files don’t match the colors as used on the tablet. This often breaks the original drawing intent, and got me annoyed.

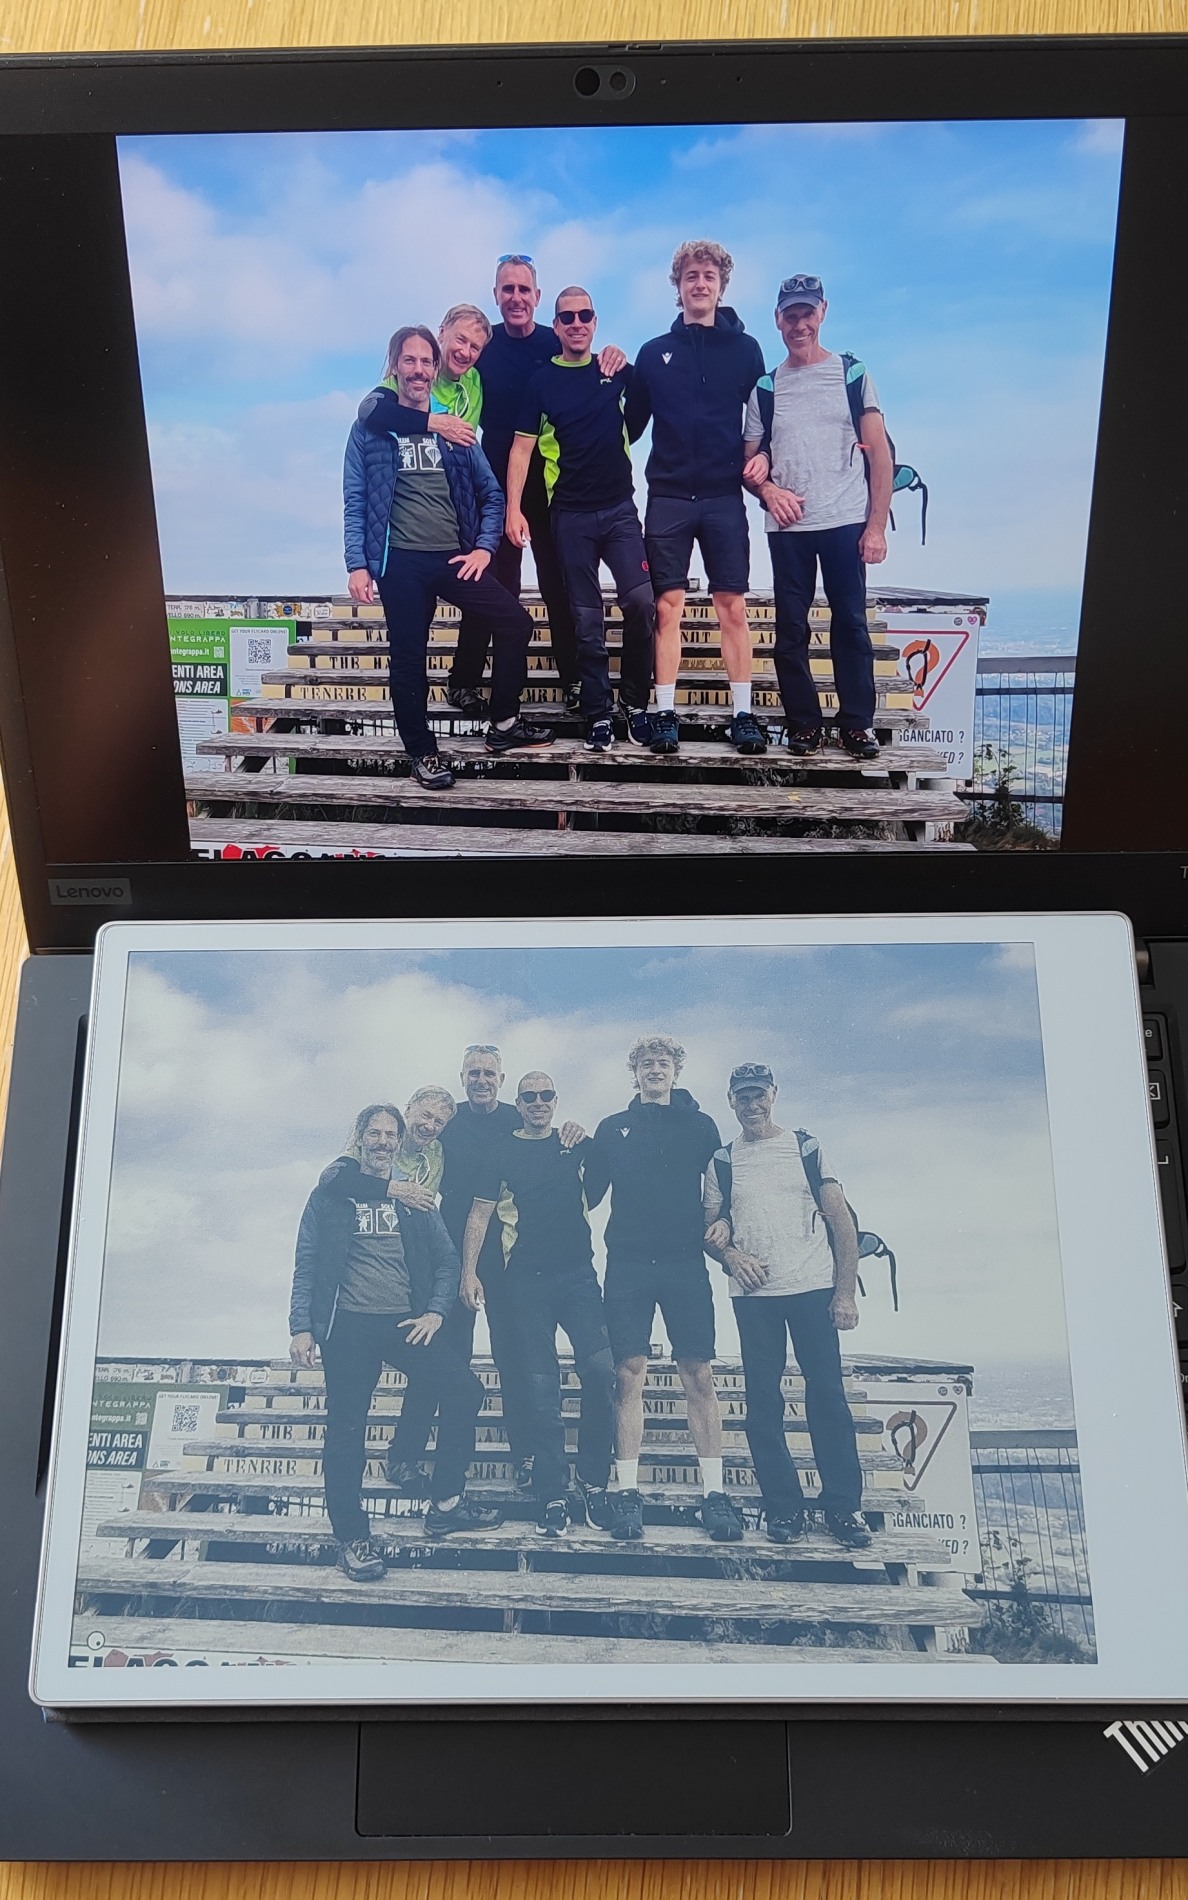
I also realized at some point that I could display regular photos on it as a digital frame, despite not being something for which the Remarkable was intended for. Yet, the faded colors, limited palette along with the dithering really grew on me. The effect evokes more the feel of a fond memory to think about instead of just being another pretty picture to look at.
You can see how the image on the right looks when shown on a laptop screen compared to the Remarkable. If you click for a larger version, the dithering is pretty apparent.
I started to want a simple way to preview or display the color output of the tablet more accurately on screen, so that I could either export the doodles as I drew them or to adjust the images on a PC for better display on the tablet.
I made a basic palette of the real pen colors and a rough color profile that you can use with image editing software that support color proofing, such as GIMP. None of this is meant to be truly accurate, and something I tried for fun to be “better than nothing”.
The method I used isn’t very sophisticated, and definitely not the best: I took a few pictures with a DSLR camera of the tablet alongside a white reference card under medium, indirect sunlight in order to avoid glare. A full color card would have been nicer, but I didn’t have any at hand.
The backlight on the Remarkable Pro was kept at the medium setting to be a little bit more balanced as I use it frequently indoors.
I then compared the pictures on a calibrated LCD screen with the actual tablet as a quick visual check.
These are the main pen colors you can use on the Remarkable Pro. As you can see, “white” is downright gray and it is sadly not an artifact. It is significantly darker than the Remarkable 2, and also why I feel some amount of backlight is always required. But in turn, the backlight also shifts the black very slightly towards blue. This is intentionally made very obvious here through the background pairing. On the actual tablet you mostly don’t notice if you have some ambient lighting.
| Color | White | RM White | RM Black | Black | sRGB |
|---|---|---|---|---|---|
| Black | #3a4861 | ||||
| Gray | #7f7e82 | ||||
| White | #a8aaa7 | ||||
| Blue | #3c5483 | ||||
| Red | #866369 | ||||
| Green | #6e7860 | ||||
| Yellow | #a09e66 | ||||
| Cyan | #5f6d80 | ||||
| Magenta | #7f627b |
Since there are a discrete amount of colors on the tablet, a correct approach for color simulation would be to use the same conversion logic the Remarkable uses: probably auto-contrast followed by quantized dither with a fixed color palette. However this wouldn’t have been too convenient to use without also writing a viewer or plugin.
My aim was to have something usable enough to perform hue/contrast adjustment on an image with instant feedback. For example, to avoid detail in the important part of an image to be crushed by the limited palette, or to shift the hue enough to move it to a more pleasant dithered color rendition.
I thought of using argyll to build a color profile indirectly through a test chart as described here. I’m honestly surprised it worked as well as it did. The result is in downloadable files. The profile can be easily be used for soft-proofing and it gives best results in “perceptual” mode.
In GIMP you can go to “Image -> Color Management -> Soft-proof profile …” to load it first, then set the rendering intent to “perceptual” and finally also enable “View -> Color Management -> Proof colors”.
The results are not too far off. You can compare the original image with the same image with soft-proof, and again the same image with soft-proof and dithering which makes it very close to what you’d see as the final result.
LCD and Remarkable

Soft-proof

Soft-proof + dithering
There’s an unintended shift of blues towards violet in the result, but it didn’t bother me enough to attempt to repeat the process or tweak the profile. I repeat, due to how the image is processed on the tablet, using a color profile for simulation is really not the best idea.
These are a few extra images for comparison with the soft-proofs and the actual result. They are aligned so you can flip through back & forth when zoomed.
The last image is repeated twice to show the intended behavior I was aiming for: adjusting the image for improved presentation. The grass looks basically brown in the first version, whereas the second is more green (for the Remarkable Pro’s impression of green anyway). The medium field is also less crushed, showing overall more detail.

Originals

Soft-proof

Remarkable Pro
Still here? Oh.. dang. Well, I’ll share some impressions I have with the Pro then. I paid the full hefty price, and I’ve been using both the Remarkable 2 since late 2021 and the Pro since 2024 so I have some entitled rants to go through.
My main complaint on the tablet is with the pen precision: we’re still far off to something which I would consider a pleasant alternative to a real pen. Since I did drafting, I can retrace an existing line with a mechanical pencil down to 0.1mm if needed, easily. On the Remarkable Pro instead, even attempting to nicely continue a stroke in my (poor) handwriting feels like a crapshoot. Somehow this seems worse on the Pro compared to the 2. This matches my experience with basically any pen digitizer I ever tried so far and I’m sad that we didn’t get any significant improvements in so many years. I also have a fairly light touch normally, and the pressure curve on either the Remarkable 2 or Pro requires me to press too much for comfort to get any “width” in any of the tools. This is normally adjustable via software on most painting programs, but not on the Remarkable. On the positive, on both versions the pen shapes are great: they’re just pens. The eraser is also precise and works as you’d expect. By comparison I cannot stand the default thick form factor of all Wacom Bamboo/Intuos digitizers.
The second biggest complaint would be the tablet being too dark. The Remarkable 2 “white” is still far from regular white paper. But the Pro is downright gray. While you can still use the 2 in dim or office light conditions without issues, the Pro requires to use some backlight almost at all times. The backlight itself is also blueish with notable bleed around the corners, which is the worst color shift I would have wanted to see indoors or for night reading. Aiming for a cool or warm white in the 3000-4000K territory would have been a better choice.
If you don’t care about color or night reading, the Remarkable 2 grayscale rendering is also superior. When reading a PDF, this has an effect on text rendering quality, especially visible on thin typefaces.
The display coating on both tablet versions is very good, but I’m still sometimes annoyed by glare with overhead lighting. Glare I wouldn’t have with a piece of paper.
I’m happy with the improvement in display responsiveness on the Pro. It really makes a difference when browsing through pages. For this reason I often find myself using the Pro as the “reference” tablet, and the 2 for writing.
Going towards the software side, on my idea of using both tablets together, I’m kind of disappointed that the notebook sync is not happening per-page but only when closing the notebook. As a result I cannot view my last written page on one as I edit the next: I need to go back by switching page on the same device, which is still too slow compared to a real notebook page flip and something I never truly got used to.
Over the years the writing interface has been kept minimalist and slowly improved. I’m very happy with this. Less is more.
What I really find lacking is the management interface in general. With virtual sheets I’d like to do what I cannot do with a true notebook: move everything around at will. I want to be able to quickly create a note wherever and then move it into the appropriate place later. Yet, right now, when you’re in the “grid view” of notebook, instead of being able to just drag something, I have to hold-to-select (which takes a good full second), then “Move”, then select a destination and then select “before or after”. This is ridiculous. It gets worse if you want to move a page from one notebook to another. Again: select the page, select move, then notice the “More …” menu on the top-left which contains a single action inside: “Move out”. Daaaamn, top notch user interface design right there. What about removing the “…” and just showing “Move out”? Or, god forbid, remove the useless step and add “Move out” directly besides “Move”? It’s not like we’re lacking space in the empty toolbar. This happens on the current 3.24 version of the software.
The mobile app is similarly clunky. No way to rearrange pages by dragging either. But at least they had the courtesy of showing the “Move out” action directly without the extra “More …” menu. I barely use the app anyway: on a phone the screen space is too cramped to do anything, and certainly if I have to drag a tablet around I’d carry the Remarkable directly, not an android one… right? This mobile app could have been skipped entirely for a better web interface instead.
The “my files” page through web doesn’t allow to do much besides organizing notebooks. No page previews. The only reason I use it for is to import PDFs because the Read on reMarkable browser extension only works on Chrome, and works poorly at that too.
This finally brings me to the desktop app, for which I have no clue because I’m on linux and so… no app. I was pretty attracted by the available OSS/linux ecosystem when I purchased the Remarkable 2 in late 2021, and it was one of the main driving reasons I decided to get it. Remy was great and did everything I wanted it to. Sadly, with each software upgrade, almost all these great OSS interfaces got broken. I’m lucky I’m still owning a Remarkable 2 where rmview works because I’m heavily using it for screen-sharing.
Unlocking the “Developer mode” nowadays also shows dumb scary warnings about reduced security too, while at the same time uploading all your documents on the cloud without end-to-end encryption.