
This is an instant camera that uses thermal printer to print photos, the same one that prints your receipts at the store. Photos aren't the same quality as the self developing film that polaroid uses, but they do have some, uhh, charm to them, I suppose.
Title might be a bit misleading though. When I call it poor man's, I mean fun diy project, possibly made by poor hands, and not a cheap camera, since the parts cost me more than the cheapest polaroid.
Although parts cost more, it's cheaper in the long run - one polaroid picture costs around 1 euro, while a picture from this camera is less than 1 cent (50 meter thermal paper roll costs a couple of euros).
Camera
When talking about camera, I have to mention that it's hooked up to a small computer which touches up the image and sends it to printer.

The computer - Raspberry Pi Zero
This is an actual computer, same as your desktop or laptop, albeit not as powerful (unless you haven't upgraded in the last 25 years), but it has ports for monitor, keyboard and mouse, it has bluetooth and wifi. It also has a few pins where you can solder LEDs, buttons, sensors and program them to do as you please.
It also has a dedicated camera which doesn't take up too much space and is easy to use.

Raspberry Pi camera with cable
Some might say this is an overkill, I say this is what I had on hand.
Power
Raspberry Pi needs a power source, you can plug it into a power outlet on the wall, but thats hardly portable, unless, you know, a really looong cable.
You could buy some rechargeable batteries, DC/DC converter, battery charge controller, and make your own rechargeable power source.

DIY power source parts
Or you can get a power bank which has all of the above included and pull it apart, which is what I did. This is somehow a lot cheaper than buying same parts separately.

Power bank, has a battery indicator too!
Get some tools, safety glasses and be careful when using something sharp to pull the power bank apart, because if you puncture the battery, it will burst into flames and it won't be fun. Not as if house fire is ever fun, but at least you can use a bucket of water to put out most burning things, here though, you'll need a bucket of sand to, literally, smother this problem.

Power bank half way disassembled, no fire

Naked power bank, still no fire
Printer
It's like your average printer, but small, requires non average paper and uses heat instead of ink to print. Ok, maybe it's not like your average printer, anyway, here's a couple of them that I have.

Forgot to take a photo before removing front panel
You can connect to it using a cable or bluetooth. So in theory, you could use your phone to take a picture and send it to printer via bluetooth. In practice though, you won't be running a risk of setting your house on fire with a punctured power bank battery and where's the fun in that?
I don't really have anything to add about the printer, got it from China, one cost 20 euros, the other 60 euros, supposedly they are the same model, but of course they are not. In any case, if you want to get one, the model is "PT-310", and, well, good luck.
Case
Whipped out my trusty ruler to measure the weird shaped printer in order to make a case around it.

Would have been a lot easier if it was a square box, but nooo
Whipped out my trusty FreeCAD to make a model and print it on my trusty 3D printer.
Got myself a few parts, case for the printer, case for the battery and computer, these should come together like a sandwich. Plus a few button things and cosmetic parts.

After some sanding checked out how it comes together.

Then sprayed on some primer to fill in some gaps.

And finally - paint, yellow and black looked good in my mind.

Hey, it does look good
Assembly
All what's left is to glue a few things, put in a couple of screws and write a few lines of code. So here are the things.

LEDs - you have to have lights
Added a few leds to tell me what's going on, blue when power is on, green when camera is on, red when a picture is being taken.
Raspberry Pi doesn't have a "power" button, you can shut it down by pulling the power chord or by programming a button to tell it to shut down once pressed. How to turn it on when there's no power button? Pull out the power chord and put it back in, aka power cycling. Instead of doing that, I added a switch which toggles power cable connection. Both of them are inside a panel on the side of the camera.
If you remember the times when after shutting down the PC there would be a message "It is now safe to turn off your computer" and you had to hit the power button, the set up above is basically same thing, good times.

Button to shutdown, switch to power off
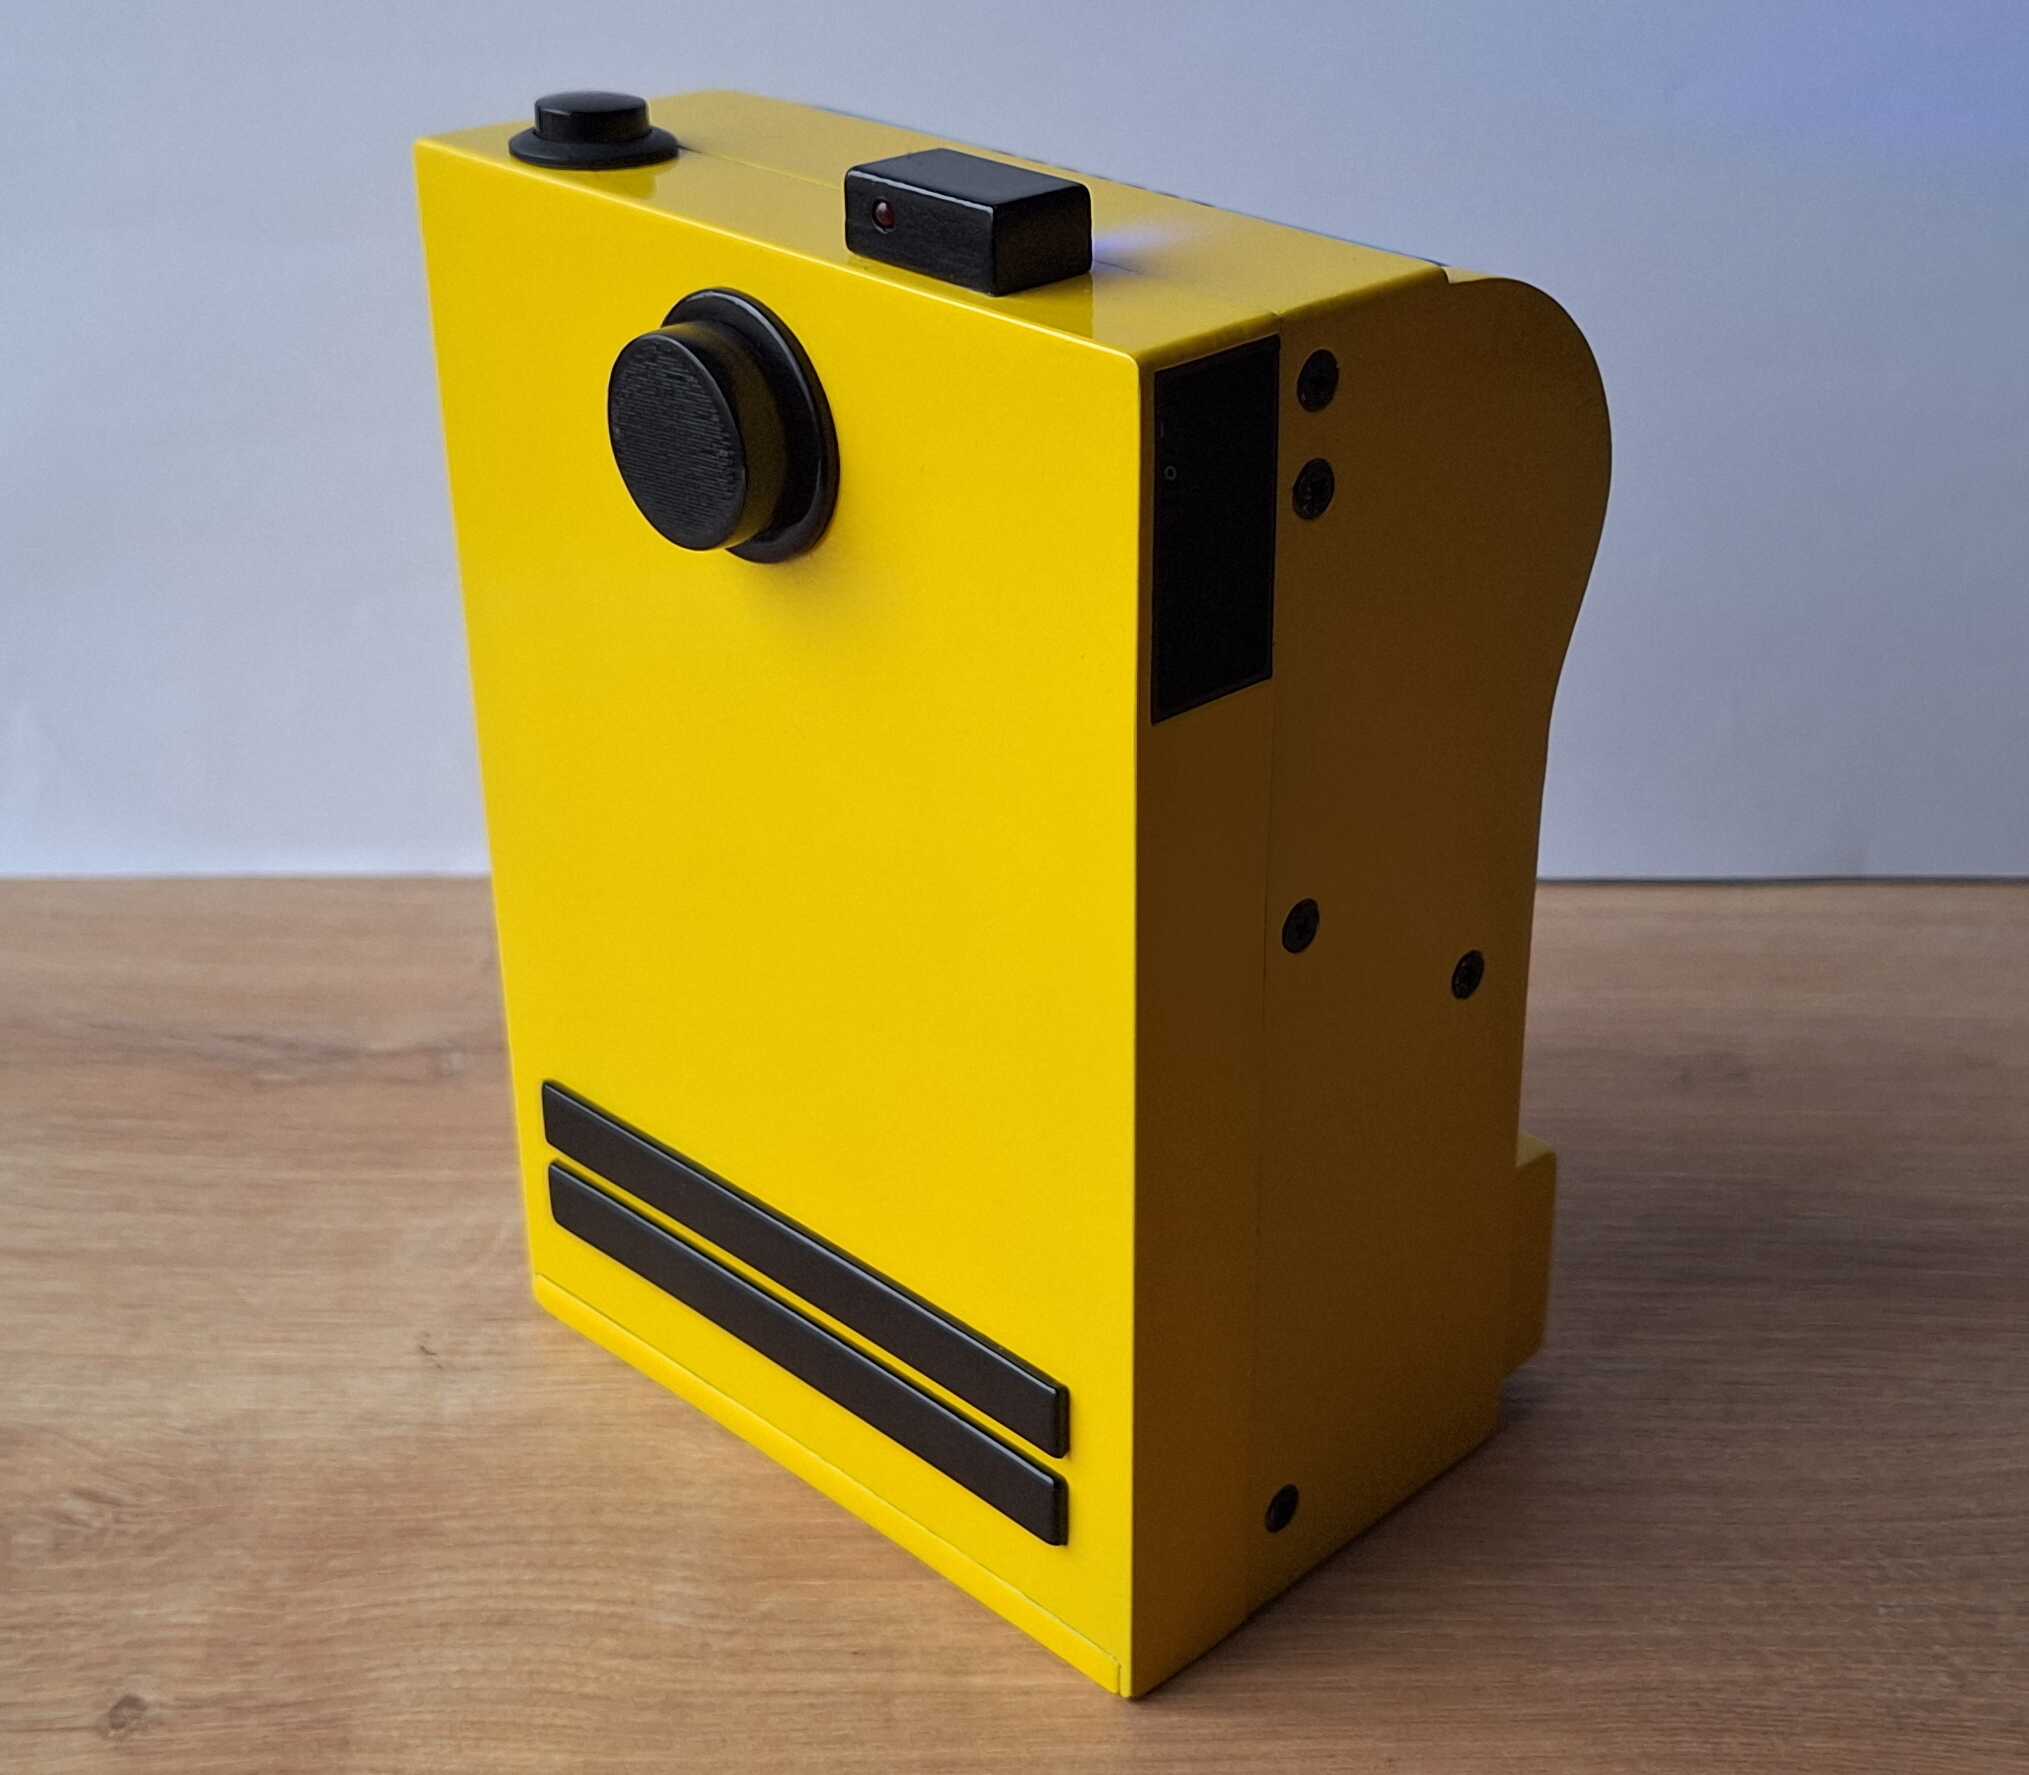
Theres another button on the front of the case which takes the photos, here you can see it at the top right, along with computer, battery (below plastic plate to hold it in place) and power buttons with lights.

Inside of the front of the camera
It's a bit messy because of all the wires, but there's no way around it, best I could do is color code them, so I know what is what.
Now the other side of the case - I drilled a few holes in the printer and used screws to attach it to the case.
There's also power bank circuit and a button which when pressed, reprints last taken photo, in case I need two of the same picture (one for me and for you).

Even more wires, fuck yeah. Two for button, four for power and two for a thing I found in the power bank - thermal sensor. If battery overheats, this sensor is triggered and power is cut off, so as to not burn your house down, which is appreciated.
Making it Work
Without going too much into detail, I used Python to code this, because of all the available libararies to work with Raspberry Pi, it's camera and image manipulation. If you're curious - code is below.
from PIL import Image, ImageEnhance
from escpos.printer import Usb
from picamera2 import Picamera2
import RPi.GPIO as GPIO
import cv2
import numpy as np
import os
import signal
import threading
import time
import io

shots_dir = './shots'
last_image = None
os.makedirs(shots_dir, exist_ok=True)

camera_busy = False
reprint_busy = False

PRINTER_VENDOR_ID = 0x28e9
PRINTER_PRODUCT_ID = 0x0289

GPIO.cleanup()

POWER_LED_PIN = 23
CAMERA_LED_PIN = 4
POWER_BUTTON_PIN = 22
CAMERA_BUTTON_PIN = 27
REPRINT_BUTTON_PIN = 26

GPIO.setmode(GPIO.BCM)
GPIO.setup(POWER_LED_PIN, GPIO.OUT)
GPIO.setup(CAMERA_LED_PIN, GPIO.OUT)
GPIO.setup(POWER_BUTTON_PIN, GPIO.IN, pull_up_down=GPIO.PUD_UP)
GPIO.setup(CAMERA_BUTTON_PIN, GPIO.IN, pull_up_down=GPIO.PUD_UP)
GPIO.setup(REPRINT_BUTTON_PIN, GPIO.IN, pull_up_down=GPIO.PUD_UP)

picam = Picamera2()

camera_config = picam.create_still_configuration({"size": (2000, 2000)})
picam.align_configuration(camera_config)
picam.configure(camera_config)
picam.set_controls({"FrameRate": 1})
picam.start()

GPIO.output(CAMERA_LED_PIN, GPIO.LOW)
GPIO.output(POWER_LED_PIN, GPIO.HIGH)

def get_image_brightness(image):
    grayscale = image.convert('L')
    histogram = grayscale.histogram()
    pixels = sum(histogram)
    brightness = sum(i * count for i, count in enumerate(histogram)) / pixels
    return brightness

def histogram_equalization(image):
    img_gray = cv2.cvtColor(np.array(image), cv2.COLOR_RGB2GRAY)
    equalize_hist = cv2.equalizeHist(img_gray)
    equalized_image = Image.fromarray(equalize_hist)
    return equalized_image

def gamma_correction(image, gamma=0.7):
    img_array = np.array(image) / 255.0
    corrected_array = np.power(img_array, gamma)
    corrected_image = Image.fromarray((corrected_array * 255).astype('uint8'))
    return corrected_image

def apply_clahe(image):
    img_gray = cv2.cvtColor(np.array(image), cv2.COLOR_RGB2GRAY)
    clahe = cv2.createCLAHE(clipLimit=2.0, tileGridSize=(8,8))
    clahe_applied = clahe.apply(img_gray)
    equalized_image = Image.fromarray(clahe_applied)
    return equalized_image

def contrast_stretch(image, low=50, high=200):
    img_array = np.array(image)
    min_val = np.min(img_array)
    max_val = np.max(img_array)

    stretched = (img_array - min_val) * ((high - low) / (max_val - min_val)) + low
    stretched = np.clip(stretched, 0, 255)
    stretched_image = Image.fromarray(stretched.astype('uint8'))
    return stretched_image

def camera_button_callback(channel):
    global last_image, camera_busy

    if camera_busy:
        return

    camera_busy = True

    def job():
        global last_image, camera_busy

        try:
            GPIO.output(CAMERA_LED_PIN, GPIO.HIGH)
            timestamp = int(time.time())
            filename = f"shots/image_{timestamp}.jpg"

            picam.capture_file(filename)

            GPIO.output(CAMERA_LED_PIN, GPIO.LOW)

            image = Image.open(filename)
            image = image.resize((576, int(image.height * 576 / image.width)))

            brightness = get_image_brightness(image)

            if brightness < 60:
                image = histogram_equalization(image)
            elif brightness < 90:
                image = gamma_correction(image)
            elif brightness < 110:
                image = apply_clahe(image)
            elif brightness < 130:
                image = gamma_correction(image)
            else:
                image = contrast_stretch(image)

            converted_filename = f"shots/image_{timestamp}_converted.jpg"
            image.save(converted_filename)

            last_image = io.BytesIO()
            image.save(last_image, format='JPEG')
            last_image.seek(0)

            printer = Usb(PRINTER_VENDOR_ID, PRINTER_PRODUCT_ID)
            printer.image(converted_filename)
            printer.textln()
            printer.textln()
            printer.close()

            os.remove(converted_filename)
        except Exception as e:
            print(f"Error during capture/print: {e}")

        finally:
            camera_busy = False

    threading.Thread(target=job, daemon=True).start()

def power_button_callback(channel):
    os.system('shutdown now')

def reprint_button_callback(channel):
    global last_image, reprint_busy

    if reprint_busy:
        return

    reprint_busy = True

    def job():
        global last_image, reprint_busy

        try:
            if last_image is None:
                return

            GPIO.output(CAMERA_LED_PIN, GPIO.HIGH)

            printer = Usb(PRINTER_VENDOR_ID, PRINTER_PRODUCT_ID)
            printer.image(Image.open(last_image))
            printer.textln()
            printer.textln()
            printer.close()

            GPIO.output(CAMERA_LED_PIN, GPIO.LOW)
        finally:
            reprint_busy = False

    threading.Thread(target=job, daemon=True).start()

def cleanup():
    GPIO.output(CAMERA_LED_PIN, GPIO.HIGH)
    GPIO.cleanup()
    picam.close()

GPIO.add_event_detect(CAMERA_BUTTON_PIN, GPIO.FALLING, callback=camera_button_callback, bouncetime=200)
GPIO.add_event_detect(POWER_BUTTON_PIN, GPIO.FALLING, callback=power_button_callback, bouncetime=200)
GPIO.add_event_detect(REPRINT_BUTTON_PIN, GPIO.FALLING, callback=reprint_button_callback, bouncetime=200)

stop_event = threading.Event()

def worker():
    while not stop_event.is_set():
        time.sleep(1)

def handle_signal(signal_num, frame):
    cleanup()
    stop_event.set()

signal.signal(signal.SIGTERM, handle_signal)
signal.signal(signal.SIGINT, handle_signal)

thread = threading.Thread(target=worker, daemon=True)
thread.start()

stop_event.wait()
Pi camera is decent, but sometimes the picture is too dark, other times there's too much light, because of this, in the code above you can see a bunch of functions which adjust the picture depending on it's brightness.

Different adjustments on the same photo. Hey, Kenny!
I've figured out when to use which adjustment by trial and error, aaaaand we're done.


And here it is in action.
If you'd like to have your own magic photo box - let me know via contacts at the bottom of the page.