Although we usually deal with old computers around these parts, today’s project comes to us from the futuristic year of 2021. What makes it interesting? You can’t buy it at your local store. Or any store, really. Today, we’re going to be getting a salvaged Loongson 3A5000-based motherboard up and running, and figuring out how good Linux is on a domestic Chinese CPU.

What is a Loongson?
For the last couple of years in China, local industry has been working hard on developing hardware and software for domestic needs. One such company is Loongson Technology, who run a fabless operation making their own chips. They started out in the late 2000s building 64-bit MIPS CPUs, which I don’t really know anything about, but then things got interesting with the development of their own instruction sets.
In other words, their CPUs are not Intel/AMD64-compatible, or ARM, or PowerPC: it’s its own whole new CPU family, with presumably-incompatible machine language.
With the 3A2000 CPU, they moved on to their own “extended MIPS” ISA, and then with the 3A5000, they released chips with their own ISA, called “LoongArch.”
One of the cool things about this design is that, unlike a lot of the PowerPC boards out there, a lot of vendors are building systems that you can actually buy around them. Taking a tour around the salvage market reveals a lot of SoC-style embedded machines, laptops, micro-ATX motherboards, mini-PCs, and even full-blown Lenovo desktop machines using a LoongArch chipset.
What’s this one?
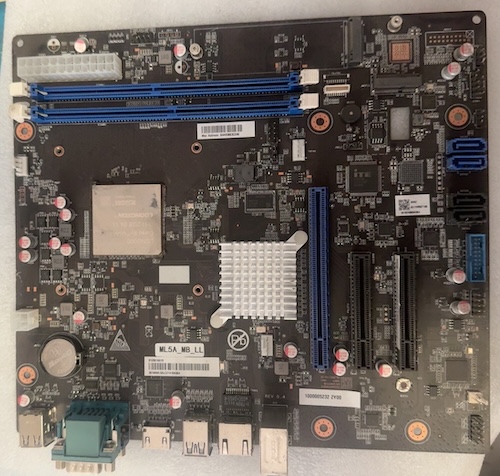
This specific motherboard, the ML5A-MB, came to me through a salvage listing on Goofish/Xianyu, which seems analogous to a Mercari-style marketplace website from what I can tell. Looking closely at the pictures in the listing, it looks as if a recycler got an entire computer in, and removed the motherboard to reuse/scrap the case and cooler. As a result, I had no idea if the board worked.
That motherboard sports an LS3A5000LL CPU, which is a quad-core 2.3GHz processor that is rated to sip 35W of power at full trot. If you click through to that link, one of the interesting things you’ll see is that this CPU has 16 GPIO pins! Clearly, they wanted to leave their options open.

Ports on the back are roughly what you would expect from any other modern PC. USB3, audio, HDMI, VGA, DE9 RS232, and integrated RJ45 Ethernet. Yeah, you read that right. There’s analogue VGA in addition to HDMI. I would have expected everything to be digital-only by now.
Prices for these things are highly variable, but this was on the lower end of the market. Using a proxy site, I paid CNY260 (about $50 Canadian at the time of writing) for the motherboard, and a further CNY96 (about $20) to ship it. That’s a little more than I would usually pay for an untested motherboard, or anything, but surprisingly a lot of them are much more expensive, and shipping would cost more with a big ol’ cooler attached.
If I had a larger budget, I could have walked away with an entire system. Like I said earlier, there were even sellers offering turn-key Lenovo towers, and there’s a handful of laptops from new-to-me brands available as well.
My new motherboard showed up after about two weeks in transit. I had a few tasks ahead of me before I could make this into a functioning computer, which we’ll cover in the next sections.
- I needed a cooler that fit. Although cooler footprints are not particularly standard (e.g. Intel and AMD use different ones) I was confident that whoever made this motherboard probably just grabbed one “off the shelf” rather than make a new one from scratch.
- I needed to stuff this thing with RAM and storage. Luckily, it appeared to take standard DDR4-3200 RAM and m.2 SSDs, which – while skyrocketing in price – were still available.
- Last, I needed to get an operating system for this thing to run. The board is recommended to be used with Loongson’s own Linux distribution, Loongnix, but they’ve been working hard to support Debian as well.
The Cooler
Before the board arrived in the mail, I started looking for coolers. I don’t know why I started at this part. Maybe because I don’t know anything about coolers. A few weeks prior, I had put together my first AM4 machine, but that (used) CPU came with a cooler. I’ve said the word “cooler” a lot in this paragraph. Cooler cooler cooler.
From some quick research, I determined that all the CPU manufacturers have decided to have different spacing for their mounting holes. Because of course they have.
After a quick search, I came across a manufacturer called Coolserver, who was selling a seriously overbuilt CPU cooler for Loongson CPUs. The page states that the “CPU hole distance” is 80 x 80mm. Would I get lucky and find out that represents a common spacing for a CPU cooler I can just buy off the shelf here? Yes, of a sort. Water Cooling UK’s round-up article shows that the LGA 2066 CPUs also happen to have an 80x80mm cooler mount.
I’m glad I waited to buy an LGA 2066 cooler, because that is definitely not what my motherboard takes.
It arrives
As soon as I worked the board out of its styrofoam shipping enclosure, the first thing I did was measure the distance between the cooler holes. Centre-to-centre, it was 75mm, which matches a super common Intel 1155. Boy, I’m sure glad I didn’t buy an LGA 2066 cooler for this!
Since I had so much trouble finding this information, my suspicion is that this hole spacing is not part of a Loongson “standard” but is instead decided upon by whatever motherboard manufacturer is doing the integration. In this case, they probably opted for an inexpensive, high-quality, commonly available family of coolers to take maximum advantage of the existing Intel supply chain. Smart.
With my local store devoid of inexpensive 1155 coolers, I grudgingly placed an order on the jungle site for a Thermaltake “Gravity i2” Intel cooler. In the meantime, I set about looking over the motherboard, hunting for any shipping damage that could cause my first journey into the LoongArch universe to be unpleasant.
One very weird part of this board is that the CPU has what appears to be hot glue around the corners of it. There’s also a very sloppy glob of hot glue on the thumb tabs on one of the RAM sockets. Did whoever put this system together glue in the RAM to keep it from coming loose during shipping? If so, what’s the deal with the CPU?
Since the board was shipped, the unshrouded pin headers for front-panel connectors (USB, audio, etc) had variously bent pins. I used a mechanical pencil with no lead in it to bend these back into a facsimile of where they were supposed to be.
I also noticed one of the soldered “tails” on the backside of the RAM connectors had been bent over and seemed to be touching an adjacent solder joint. A bit of work with my Hakko straight-jaw pliers fixed that, and I went over the rest of the board looking for other bent things to fix.
Naturally, I took zero pictures of any of this happening.
Cooler install
I was getting ready to smear some thermal paste on here and receive the collective anger of the Internet, when I realized the new cooler I had bought came with a weird plastic cover on the bottom. After removing the cover, I realized someone had already applied thermal paste to the cooler! Convenient, and not least because it allows me to escape blame for my own special technique of applying thermal paste.
Sure enough, the 1155 cooler bolted right into the existing backplate (I lined them up beforehand to make sure they were the same) and I snugged it on slowly in a star pattern. At last, it was time to throw this board into the micro-ATX case I had lying around and fire it up.

Since this thing follows standards, it’s a really easy install. In fact, it was a smoother job than installing an MSI X470 Ryzen board was a few weeks earlier – the front-panel labels on the ML5A are much easier to read.
First boot
After connecting all the front panel connectors and saying a small word of thanks to the anonymous engineers who made this sucker, I hit the power button. After a series of beeps and VGA sync gains-and-losses, it let out a constant BEEEEEEEEP at high volume and kicked me into the UEFI shell.

The shell reads:
UEFI Interactive Shell v2.2
EDK II
UEFI v2.70 (ZD-TECH, 0x00010000)
map: No mapping found.
Press ESC in 1 seconds to skip startup.nsh or any other key to continue.
Shell>
The shrieking of the speaker was getting to me, so I shut the computer off and tried to find a way to turn the speaker off. No such luck, so I just put some tape on the buzzer.

That made it still annoying, but much more tolerable while I figured out my next step. Not being familiar with UEFI, I wanted to poke around in the shell to see if I could find any cool features, such as a RAM test. No luck there either, but at least the keyboard was working.
Almost-operating system
While the board was in transit from China, loong64 became an official architecture of Debian. That’s a pretty nice coincidence. Of course, stable isn’t going to be provided until the forky release in 2027, but it sounded like at least things are headed in the right direction.
Since this computer is intended to be a “toy” for now, I didn’t want to spend too much money on storage for this operating system to run on. Even though the modern era has significantly bloated installs, Debian is still pretty svelte, so I figured I could get away with a 256GB SSD.
It was at this point I realized that I didn’t know how physically large of an SSD this machine took. The M.2 cards come in different physical dimensions, described as “width height” sizes. For instance, “2280” is a 22mm wide x 80mm long SSD, seemingly including the edge connector. I took a caliper to the footprint on the board, and it read 75mm, so I needed a 2280.
The local electronics recycler sells 2280 M.2 256GB SSDs for about $27 Canadian, which is probably a reasonable price, especially considering the recent ridiculous inflation in the flash memory industry. They are used, of course, and you can’t pick what brand you get, but the folks at the recycler claim that they have “95% and above” health condition, whatever that means. I’m not sure what other brands they have, but I am pretty happy at having gotten a Toshiba. Maybe one day I’ll have an entire computer made by them.
Now that I had some storage, it was time to install it. Debian doesn’t have a livecd or anything particularly fancy at the moment, but they do have a Debian 12 NETINST ISO available on the loong64 port page. I wrote this somewhat old ISO to a USB flash drive using all the default Rufus settings, but the computer continued to end up in the UEFI Shell. Somehow during this, the computer decided to stop shrieking at me during the speaker, so that’s a win already.
During one of the restarts, I noticed that the computer also displayed a brief sign-on message before heading to the Shell. It’s hard to read, because the crappy Samsung LCD I was using to test it likes to put itself in sleep mode and only wake up after a lot of frames have been missed, but I was able to see “Del” and then a bunch of Chinese characters. I restarted again and mashed Del… and got into a more traditional BIOS settings screen!

Even better, it had an English language setting near the bottom of the first page.

It is revealed that I was running KunLun BIOS v4.0.

Unfortunately, the boot order was already set to boot off of the USB stick. If I tried to forcibly boot off of the USB stick on the last page of the settings, it would just flash the screen black and then return to the BIOS screen. I re-wrote the USB stick two more times, first using the “DD” method and then changing the partition table to “GPT,” but neither change worked. I could clearly read the disk from inside the UEFI Shell, as ls fs0: worked, but run fs0:boot/vmlinuz just paused for a second and then returned me to the shell. I was missing something.
If I ran bootloongarch64.efi, which worked for one of the Debian maintainers, it would raise an error cannot allocate memory for memory map. Aborted. Press any key to exit. Searching for that error message, of course, led to a GitHub issue that told me I needed to update my BIOS. Despite the fact that the Debian page also warned me to do so, I really did not want to update my BIOS, but let’s update that BIOS.
Updating the BIOS
The Loongson git repository containing firmware images offered four options for my board, the ML5A. Unfortunately, they were cryptically named, with no documentation:
UDK2018-LoongArch-ML5A-stable2408_Gmem_dbg.fdUDK2018-LoongArch-ML5A-stable2408_Gmem_rel.fdUDK2018-LoongArch-ML5A-stable2408_NoGmem_dbg.fdUDK2018-LoongArch-ML5A-stable2408_NoGmem_rel.fd
For rel and dbg, I can guess that those mean “Release” and “Debug,” but what was “Gmem?” Some searching indicated that it is a new virtual-memory model that tries to integrate external memory in some better fashion. That confused me, but I decided that I would probably like to have it, whatever it is, and besides, the BIOS chip is socketed(!) on this motherboard anyway. I chose the release version with gmem and downloaded it.
The main readme of the repository had some good nuggets of info, walking me through how to do an update from a USB stick. It also had this piece of gold, which tells me we’re in good hands:
Back up current firmware. We recommend that you need a burner, and read the contents of the SPI flash through the burner and save it.
Imagine any of the North American motherboard manufacturers telling you to buy a programmer and do an SPI flash dump before updating your firmware. I love it.
I decided to ignore this advice and do an update. From the “Save & Exit” tab of the BIOS screen, there is an “Update BIOS” option. Picking that will let you navigate through the filesystem of the USB stick and then select the *.fd image. At that point, it brings up a “Firmware is being updated, please do not power off” screen and a very slowly increasing progress bar. One of these days, someone should make a firmware update screen that isn’t terrifying.

Somewhere in the middle of this process, the screen shut off and then I got kicked into a completely new BIOS screen that was now once again in Chinese. It still had an English option. Hooray!

Debian, again
I rewrote the Debian install media using Rufus, this time with all the default settings. This time, the computer booted instantly to the installer’s Grub bootloader when selected from the BIOS menu. I picked “graphical install,” and it panicked because it was unable to mount root fs on unknown-block(0,0). On a second attempt, I noticed it was first complaining about not being able to find a file marked /install/gtk/initrd.gz, which was indeed missing from the filesystem. I must have accidentally bumped a key and skipped that message the first time. Regular install it is.
This process started about as you would expect for a Debian text-mode install, including all the awkward pauses where it seems like it isn’t doing anything. I was using a non-free Edimax USB wi-fi adapter at this point, so the installer stopped me to tell me to go get the Realtek chipset drivers and put them on some disk it could access. It then went away, and asked me for another driver, this time a firmware blob for what I assume is the onboard NIC. If you give a mouse a cookie…
After that, the net installer was able to establish a friendly connection with my wi-fi router and set about the great project of installing nets. Er, installing from nets.
I named the new hostname qie, which is sort of a terrible Romanization of the Chinese word for penguin, 企鹅 (qǐ’é.) It seems as if the literal translation of this word is close to “standing goose,” which is very funny. Look, this blog is educational.
Although I was conflicted, I decided I would follow the Debian installer and use a swap partition. I know it can shorten the write lifetime of the drive, but this computer is unlikely to become my main system, and the drive has already been hammered by some other dude before it hit the recycler anyway.
I ran into some trouble trying to configure apt and get the package mirror configured; it kept insisting that various mirrors didn’t support the sid distribution, when they clearly did. Eventually, I figured that this was probably a network problem, and went back to restart the configuration of my wi-fi device. A few more DEAUTH_LEAVING events came while I was trying to get more packages installed, and I was starting to remember why this USB wi-fi adapter was in the back of a drawer, after failing to use it reliably with the Raspberry Pis.
I wired the Loongson quickly to an Airport Express serving as a wireless bridge, and everything went smoothly after that. GNOME and GNOME Flashback did not install because of various unavailable or conflicting dependency packages (on a fresh install, using tasksel? I can only assume this arch is still a little bit in-development, although Debian 12 is also very old) but XFCE happily installed. I prefer WindowMaker anyway.
After a reboot, I found myself back at the Loongson BIOS screen. A new boot device had been added: debian. I picked it and ended up in grub, and then booted into my newly-installed XFCE environment. I’ll have to figure out how to get this thing to autoboot later, but for now, I have a working Linux environment.

Wi-fi, part 2
To fix the terrible USB wi-fi, I decided to grab a real wi-fi card. Amazon had what was claimed to be a PCI-E x1 wi-fi card with a compatible AR9220 controller for eleven bucks. Unfortunately, when it arrived, it turned out to be a PCI wi-fi card, which I would have noticed if I looked closer at the picture. That was returned, and I then doubled down on my plan to cheap out.
I decided that I would grab an M.2 wi-fi card, because I had an extra tiny M.2 slot on the motherboard, and it would be neat to have wi-fi built in with no awkward card jammed in the back. eBay provided an “Intel 9560NGW” for $7 US shipped. When it finally arrived, I slotted it right into the machine, screwed it down, and then fired it up.
After I was able to get to a prompt, I checked to see if the card was detected. lspci | grep -i intel didn’t mention anything at all about this card, which is weird for something that is in a (teeny little) PCI slot. After a quick web search, it turns out that some of these Intel wi-fi cards aren’t M.2 at all – they fit into an M.2 slot, but use a proprietary Intel interface called CNVio, where most of the guts of the card are done on the motherboard chipset. Wish I had known that before I bought one!
I went back to the Airport Express bridge after that, but I do plan to eventually buy a PCI-E x1 wi-fi card. Modern computers are so much fun!
Upgrading Debian
Of course, sid is a pretty unstable “release” of Debian. I decided to see if I could get something more filled-out, which would hopefully make installing exotic packages (like SDL2, apparently) a little simpler.
After some mucking around in sources.list and consulting debian ports, I determined that only sid is really “supported” by Debian, which makes sense as that’s probably where all the work for forky/2027 is going. Then I found the unofficial loong13 branch of trixie, which is hosted on debian.net. Then I broke my apt badly trying to use their deb repository without knowing how to tell the machine to accept the release signature.
I ended up finding the package that installed the keyring (debian-loong64-non-official-archive-keyring,) digging the *.deb file out of the pool, and installing it with dpkg -i. Then I figured out what file it installed using dpkg --listfiles and provided that to my apt sources. That let me do apt update to the unofficial trixie, and I was ready to do a dist-upgrade. This… surprisingly… worked?
Even if it had blown up, the unofficial loong13 project also provides a network installer ISO, and my install was fresh enough that I wouldn’t mind paving over it to get a more useful version of Debian installed.
Benchmarks
What do you do when you get a new-to-you CPU? The obvious answer is to benchmark it against some other CPUs to see what it’s faster than.
Phoronix has a bunch of benchmarking tests, so I decided to head over to their website, OpenBenchmarking.org, and see how the 3A5000LL was holding up. The answer is not especially well, but that’s an aggregate view and CPUs have gotten really fast since 2021 (or, if you’re feeling more generous, the 2015 Intel CPUs that this is reported to be about the same speed as.)
For starters, I decided to compare the collected results against the Intel i5-3570 (2012.) Why that one? I just evicted one of those from my Windows computer because it could no longer hit minimum specs for new games, so I wanted to see if it was still more worthwhile than my new prize.
The answer is: without exception, the 3A5000LL was not faster than my old i5-3570. And it absolutely is not anywhere near faster than the Ryzen 5 3600X that I replaced the i5-3570 with.
You can make a bunch of excuses for this. Compilers are probably not optimizing well for the 3A5000 yet, whereas we’ve had decades of Intel/AMD dominance in personal computing that make that investment pay off. But it seems overall that the Loongson in practice is not even beating a 14-year-old Intel budget CPU. It narrowly beats out an Intel Core Quad Q6600 from 2007, so at least the Loongson does whip the CPU I had prior to the i5-3570.
At the time of writing, OpenBenchmarking.org had the 3A5000LL at roughly the 13th percentile. That’s not too bad when you consider that it’s being compared against every CPU ever made. I doubt I’m in the 13th percentile of the world’s fastest runners. The faster-clocked 3A5000 places in the 14th percentile, and the later (2023) 3A6000 gets bumped to 21st percentile, both of which seem like nice leaps to me.
I think it would be interesting to do a more in-depth comparison, but I may not be well equipped for this kind of spreadsheet-bothering. No, let’s see if this sucker can run Doom.
Videogames
Of course, everyone knows a modern computer can run a Linux port of Doom. I know for a fact that Chocolate Doom doesn’t need an extremely powerful video chipset, so it’ll probably work on whatever integrated video chipset this Loongson has. Plus, it has an easy Debian package. I decided to install that and then copy doom2.wad into /usr/share/games/doom. chocolate-doom then immediately started up in Doom II.

Shocking nobody, Doom II runs quite well on a computer made 27 years after its release. Now we can give this thing a bit of a challenge.
Say, what is this thing capable of? Let’s put it to the test with Extreme Tux Racer.

On the test “bunny hill” level, I was getting about 30-38 frames per second, which is not phenomenal, but is entirely playable. So even hardcore gamers will be pleased with their purchase of a turbo-budget Loongson!

Quake ran pretty well on this thing at default settings, although timedemo demo1 revealed that it was again only getting about 33fps on a windowed 800x600 context. The console (via Quakespasm) did spit out a ton of information about the video chipset, however, including that it had tons of nice GL extensions available.
So what video chipset is it?
lspci reveals that the video chipset is reported to be a Loongson 7A1000, which appears to be the north/southbridge for the motherboard. So it’s an integrated video solution of some kind. This unofficial LoongArch FAQ tells us that it’s “based on the Vivante GC1000.”
Unfortunately, I wasn’t able to install mesa-utils to figure out exactly what the adapter reports for extensions and capabilities. This is because the package insists on a specific pinned version of the xkb library, which my increasingly-rickety Debian install wants me to downgrade a bunch of stuff to use. I am going to leave that particular fun for another day, and just repeat what the official documentation says:
The GPU supports OpenGL ES 2.0 and OpenGL ES 1.1; OpenVG, Futuremark certified, BitBLT and Stretch BLT, rectangle fill, hardware line drawing, color font rendering, YUV color space conversion, and high quality scaling. Space conversion, high quality scaling, etc. The display controller supports dual DVO signal output and hardware cursor, gamma correction, output dithering, etc. The memory interface uses 16-bit DDR3 SDRAM interface with a maximum data rate of 1333 Mbps.
OpenGL ES support on a desktop is maybe not as exotic as it once was, what with all the WebGLs out there, but 2.0 does have shader support. Whether or not things running on Xorg are taking advantage of it for hardware acceleration is a bit of a mystery at this moment – I may actually end up reinstalling the OS from Trixie to start with and hope that fixes it.
YouTube
After installing firefox-esr, I decided to go check if YouTube works. Modern web video is encumbered by a million different codecs, many of which are proprietary. Even great old machines like the Power Macintosh G4 series are having trouble keeping up with the Commodores these days.

To my delight, YouTube seemed to work just fine, and I was able to catch up on some essential PC-6001 repair videos. It didn’t even serve me any pre-roll ads, which is probably the ideal outcome for any general-purpose computer.
Conclusion
The real surprise with this machine is not how weird it is – it’s how normal it is. So many standards are followed in the Loongarch machines that, if you never ran uname -a, you’d probably never have any idea that it wasn’t a regular old amd64 on a cheap clone motherboard.
Truth be told, I’m a little bit disappointed that it isn’t more quirky and odd. Maybe the “more official” Linux distributions like Loongnix and Deepin have more cool stuff, but that could be run on regular commodity PC hardware too.
A huge part of this success comes down to the hard work of all the contributors to Linux and the related userland ecosystem, who have slaved away to make things as portable as possible. According to that Trixie-port page, virtually everything can simply be built from source and doesn’t care that it’s running on this different computer architecture. As someone who fixed stuff for Linux/PPC, that’s amazing on its own.
If you have any ideas for things I could run on this Loongson, or research questions in general for me to chase down, let me know. Like most things in my pile of computers, I don’t really have a great use for this one, but it sure is cool. I would like to try assembly language, but that’s definitely a project for a future entry.
Thanks for reading!