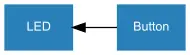
Back in 2015, I had the idea for gpiozero — a Python library for Raspberry Pi, making programming GPIO devices simpler by abstraction: instead of thinking about pin channels, voltages, pull-up resistors and rising or falling edges, we think about buttons being pressed and released, sensors detecting light or motion, and motors driving forwards and backwards. gpiozero let you write code in these terms.
We developed a device-focused API, and patterns emerged. We ended up supporting three types of programming:
Procedural:
while True:
    if button.is_pressed:
        led.on()
    else:
        led.off()
Event-based:
button.when_pressed = led.on
button.when_released = led.off
Declarative:
These three snippets achieve the same thing in different ways. One repeatedly asks the button if it is pressed; one tells the button to control the LED; and one tells the LED to follow the button's state.
It's hard to say which one is easier to read, write or understand. Maybe the last one, since it's a single line. But if you wanted to reverse the logic, and make the button turn the LED off instead of on, it would be trivial to work out how to change the first two, but not the third.
But that's where it gets interesting! We provide functions for manipulating the stream of values as it passes from one device to another:
led.source = negated(button)
and even for providing artificial value streams like a sine wave:
servo.source = sin_values()
This would drive the servo steadily between its minimum and maximum points.
The way all this works is by gpiozero assigning standard value ranges to devices. Some are simple booleans, like the button and LED. The button is 1 when pressed, otherwise 0. For the LED, 0 is off and 1 is on. We can use PWM to control the LED, allowing it to have its brightness set on a scale from 0 to 1. And if we take an analogue input that reads 0 to 1, we can directly control the LED's brightness from that device:
pot = MCP3008()
led = PWMLED(pin)

led.source = pot
Some devices go from -1 to 1, like a motor, where the 0 to 1 part is speed forwards, and the 0 to -1 part is speed backwards. So the sine wave would make it ramp up to full speed, slow down, reverse direction, and ramp up to full speed the other way.
You might want to manipulate or combine value streams — so we provide a collection of functions for common use cases, like negated, inverted, clamped, scaled, absoluted, booleanized, zipped, and smoothed. And you can write your own generator functions too.
I used to regularly include this concept in my many conference talks while working at Raspberry Pi, and I wrote a docs page explaining it. This page showed how the relationship between devices could be expressed using simple flow diagrams:


This led to an idea — a web-based UI where you could drag and drop GPIO devices from a side panel into a freeform canvas, and draw lines between them to connect them. If you connected an LED to a button, the button would control the LED, purely based on source/values.
There's a project called Node-RED that works this way, but I found it convoluted, and its GPIO functionality was pin-based rather than device-focused. What I had in mind was based purely on how gpiozero's source/values worked.
I knew what I wanted but there were too many complexities to manage, and it required a lot of knowledge of modern JavaScript. So here we are in 2026 and I have Claude to make light work of such things.
I wrote a description of the idea and a spec for the MVP — purely a simulator — and quickly had a working prototype after agreeing on some tech and design choices. I spent some time tweaking the UI, adding configuration, icons and animations. It soon became a fun tool to play around with:

We added a Python code generator so you could see the equivalent Python code for your project. We then looked into methods of remotely controlling a Pi's GPIO pins, and wrote an agent to run on the Pi. The web app communicated with the Pi using websockets, and it just worked.
We added and refined more features and functionality — supporting pretty much every device in
gpiozero, including internal devices like TimeOfDay, the range of source tools for manipulating
value streams, and artificial sources such as sin_values:

I wanted to support add-on boards, but that didn't lend itself well to source/values because the shape of a composite device made up of input and output components makes it hard to use. However, it's useful to be able to drag in a board you have and not have to assign all the specific pin numbers it uses — so I included the boards but made them appear on the canvas as separate components, pre-configured on the correct pins.
I thought it would be useful to be able to break up composite devices like traffic lights into their
component parts, and convert LEDs into PWMLEDs and back — so we added that. We added a limited
set of init params, and added a link to the gpiozero docs for each class or function. I wanted to be
able to save multiple canvases — so we added localStorage support. From there we constructed
compressed JSON base64 encoding to allow the creation of shareable links, plus importing and
exporting in different ways.

While remote GPIO worked for me on localhost, Claude did point out that we would have issues if this was hosted over HTTPS — because you can't make insecure websocket connections from an HTTPS origin, and you can't use secure websockets because you can't get a certificate for a device on your LAN.
Initially, we bundled the web app into a simple download and provided instructions to run the app locally, but a suggestion from my friend Robie ended up making it simpler. I published a Python package called gpiozero-flow which includes both the websocket agent and the web app itself. With this installed on the Pi, and both the web app and the agent running, the hosted app at flow.bennuttall.com lets you hand over to your Pi's own instance of the app — just enter its IP or hostname, and your project comes with you via the share link. From there you can switch to Live mode, which controls your GPIO pins directly.
So there we have it — an initial version of the project is live. Give it a try and see what you think!

I'm not sure who might find it useful. It's experimental and I just had to try making my idea. In a way it's a simple graphical programming tool like Scratch, Blockly or Edublocks. But you could argue that to do more than the basics requires more advanced logic. Maybe it's a useful computational-thinking tool rather than a programming one — perhaps it would suit the subject of systems and control better than computing.
I could look at adding support for gpiozero's event-based paradigm, as I think this would work well, but it might break the mental model of understanding values flowing between devices. There's also the possibility of adding custom functions to use as generators, but again, I'd end up bolting on a procedural programming tool.