A few months ago our whirlpool washer wouldn’t spin. It did everything else, but it was pretty worthless without the spin function because the clothes would just be sitting at the bottom of it completely soaked after a wash. Of course, the first thing I did was go to Google and type in “Whirlpool washer won’t spin” and got a lot of hits on some great websites. Most of them were repair websites and forums sponsored by kind individuals who freely share their knowledge such as fixitnow.com. Others are sponsored by companies who sell parts to DIY homeowners, like repairclinic.com.
The forums always suggest the most common and easy fixes first, like the lid switch, which wasn’t my problem. So I had to start disassembling the washer because the next item on the list was the coupling on the motor. Fortunately, these websites have directions on how to get the washer open, which takes very little effort, as long as you know which screws to remove and in what order. I knew that the coupling was unlikely to be the failed item because the agitator was still working and it would be unlikely that a failed coupling would allow that to work. Then I started looking at the clutch/brake mechanism and that also looked OK. Finally, I figured it had to be the transmission, one of the hardest items to remove. I had the entire washer torn apart and moved to the kitchen because our laundry room is more of an alcove in the entryway between the garage and the kitchen.
After pulling the transmission, I was faced with the prospect of taking it apart, knowing it would be filled with heavy oil.
To pull your washer’s transmission, you need to remove a bolt at the top of the shaft holding it to the agitator. To expose that bolt, you have to pull off the plastic cap on the top of agitator as well as another translucent seal below it. Note the translucent cap has an o-ring seal on it. Make sure to put it back in properly when you re-assemble the washer to keep water out of that bolt’s compartment or it will rust and fuse with the shaft.
I carefully took out all the screws holding on the transmission’s top cover and drained the oil into a jar. This was going to a really messy job and so I put on some vinyl mechanics gloves.
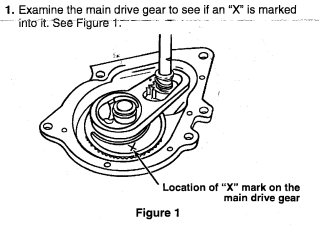
I was amazed at the complexity of the transmission. It has to perform several functions, all without any input other than the direction the motor. For instance, it has to agitate, spin, and also go into neutral without any shifters or solenoids. The same motor is simultaneously running the pump from a portion of the drive shaft that comes out the other end. The transmission uses a rather complex plate of pawls, gears, and cams on something called the ‘rack retainer’. I was trying to simulate spinning the motor forward and backward and thus I could shift it from spin mode to agitate mode, but I couldn’t get it into spin. It was then that I realized that something called a ‘shoulder pawl stud’ was broken off at its threads and the rack retainer was spinning freely. This pawl stud works as an axle and also as a way of getting the plate to spin along with the spin gear, but it was broken with its threads embedded in the main gear. So I had to find a new pawl stud and figure out a way to extract the threads from the hole they were in. I was pretty sure that the threads had some locking compound on them and they weren’t going to come out easily.
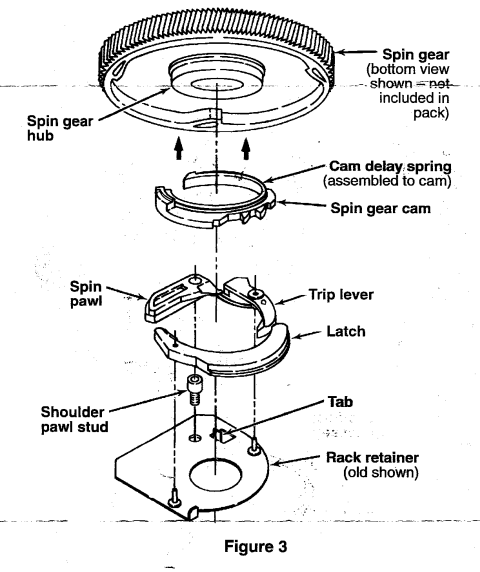
The pawl stud wasn’t available as a separate part, but there was something called the Neutral Drain Pack from Repairclinic.com which included a lot of parts, including 2 different studs, since Whirlpool evidently beefed up the threads for the newer models, no doubt because it was a weak point. The upside to that is that if I ruined the threads extracting the broken stud, I could drill and tap it for the larger stud and newer rack retainer. So as my wife headed off to the laundry mat with a load of wash, I order the parts on line. The neutral drain kit was about $17 + $6 shipping. In the meantime, I tried to drill the screw threads out of the main drive gear. I broke a drill bit doing it, but got enough of a hole down through the middle of the broken screw shaft that I thought I’d have success with an ‘easy out’. I took it into work and borrowed an easy out and with the help of an arbor press to apply pressure to the easy out, I extracted the broken screw without doing any damage to the threads.
A few days later, the parts arrived. The kit contained a lot more parts than I needed. I replaced all the old parts with new ones, figuring after 15 years of service, there was no point in reassembling things with old parts when I had new ones right there. Getting everything back together required some head scratching, but after thinking it through, I was able to manually operate the transmission and check the agitate and neutral modes.
After a little fiddling everything went back together and I ran a cycle through without clothes and was very happy when the spin mode began working again. Now it’s been working for a few years, I figured that the $23 and my time was worth it because if I had a repairman do it, I’m sure it would have been over $300 because he would have likely replaced the whole transmission. That would be beyond the value of the washer. It was also better than throwing it away and buying a new one for somewhere between $600-900. I generally don’t fix things myself just for the savings because if you consider my time, it’s not really saving me that much. I do it more for the educational experience and the satisfaction of knowing that if it ever breaks again, I can choose to either fix it myself or buy a new one, if we think it’s time for its retirement.
I’ve included the meager set of instructions for the Neutral Drain Pack in pdf format here.
UPDATE: 2009-01-07 I continue to get comments and emails on this posting. I just got one asking about getting the transmission apart and so I’ve uploaded a new picture that shows what a messy job this is. Click on it for a higher resolution image.
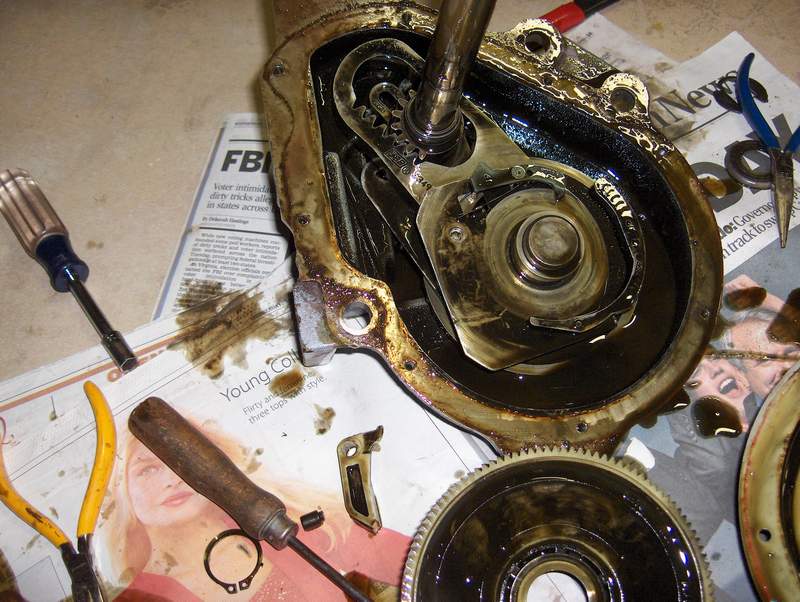
The snap ring (shown next to the screw driver laying on the newspaper) needs to be removed from the shaft to get the top cover off of it. I can’t recall if I had the proper snap ring pliers or if I used needle nose pliers ‘in reverse’ to spread open the snap ring by its holes. I managed to save all the oil and reuse it afterward, but if you lose some or it looks dirty you can get more from an appliance service center or use SAE 90 weight gear oil if you can’t find a service center.
There is also the possibility that your washer is caked with mud, so if the basket won’t spin, it may be clutch that is worn or can’t overcome the friction of mud caked between the basket and the tub like the image below:
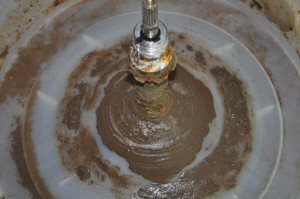
This photo was sent to me by a reader who found mud stuck between the basket and tub. His washer wouldn’t spin because the clutch couldn’t overcome the friction caused by the mud. If your spin cycle is intermittent, then this could be the potential cause of it.
Another resource you may find useful if you’ve gotten this far is this .pdf file for the service manual for a Whirlpool direct drive washer. It’s got the schematics, troubleshooting instructions, parts list, etc., for the whirlpool washer.