Three months after I built my new computer, it started annoying me. There would occasionally be a noise that sounded like a fan was catching on a cable, but there weren’t any loose cables to be a problem. Over the course of a few weeks, the sound got progressively worse to the extent that I didn’t want to use the computer without headphones on. I measured the sound at 63 dB, which is about the sound of someone talking. That may not sound terrible, but it’s a constant, nasty noise coming from something that sits about 40cm from my head.
After some investigating, I identified the PSU fan as the culprit. I have a Cooler Master V750 SFX, which is not super high-end, but wasn’t cheap, either. It shouldn’t be developing issues after three months. Thankfully, it comes with a ten-year warranty, so it should be easy to get sorted, right?
Warranty woes
I looked at Cooler Master’s warranty, and for issues within the first two years you have to deal with the retailer. That would be Amazon in my case. So I looked at Amazon’s information on warranty issues. Their policy is that if it’s more than 30 days since purchase, you have to send it off to a third-party repair center and wait for them to diagnose and try to repair it. Here’s the kicker:
Usually repairs take up to 20 business days (including delivery time), but could take slightly longer
I use the computer for work, have upcoming LAN parties to go to, and generally can’t do without it for an entire month. That’s assuming they reproduce the issue: the PSU fan only turns on when it reaches a certain temperature, so if you just plug it in briefly it won’t exhibit any symptoms.
If I was going to do a warranty return, I’d need to buy a new PSU first to use while this one was away. If I’m spending £100+ on a PSU, then I’d be getting a better one that doesn’t have known issues with the fans. So when the Cooler Master eventually got returned I’d have no use for it. What a waste.
So the warranty is about as much use as a chocolate teapot. Good to know, I guess. If I wanted decent service, I should have probably used a real retailer, not Amazon. Lesson learnt.
Doing some research
If the warranty is useless to me, maybe I should just void it and try to fix it myself. I did some research online. Most of the results went like this:
if you’re not a trained professional you should not be opening up your PSU at all. There’s a lot of current that goes through it which will seriously hurt/main/kill you
or
it’s time consuming and potentially dangerous
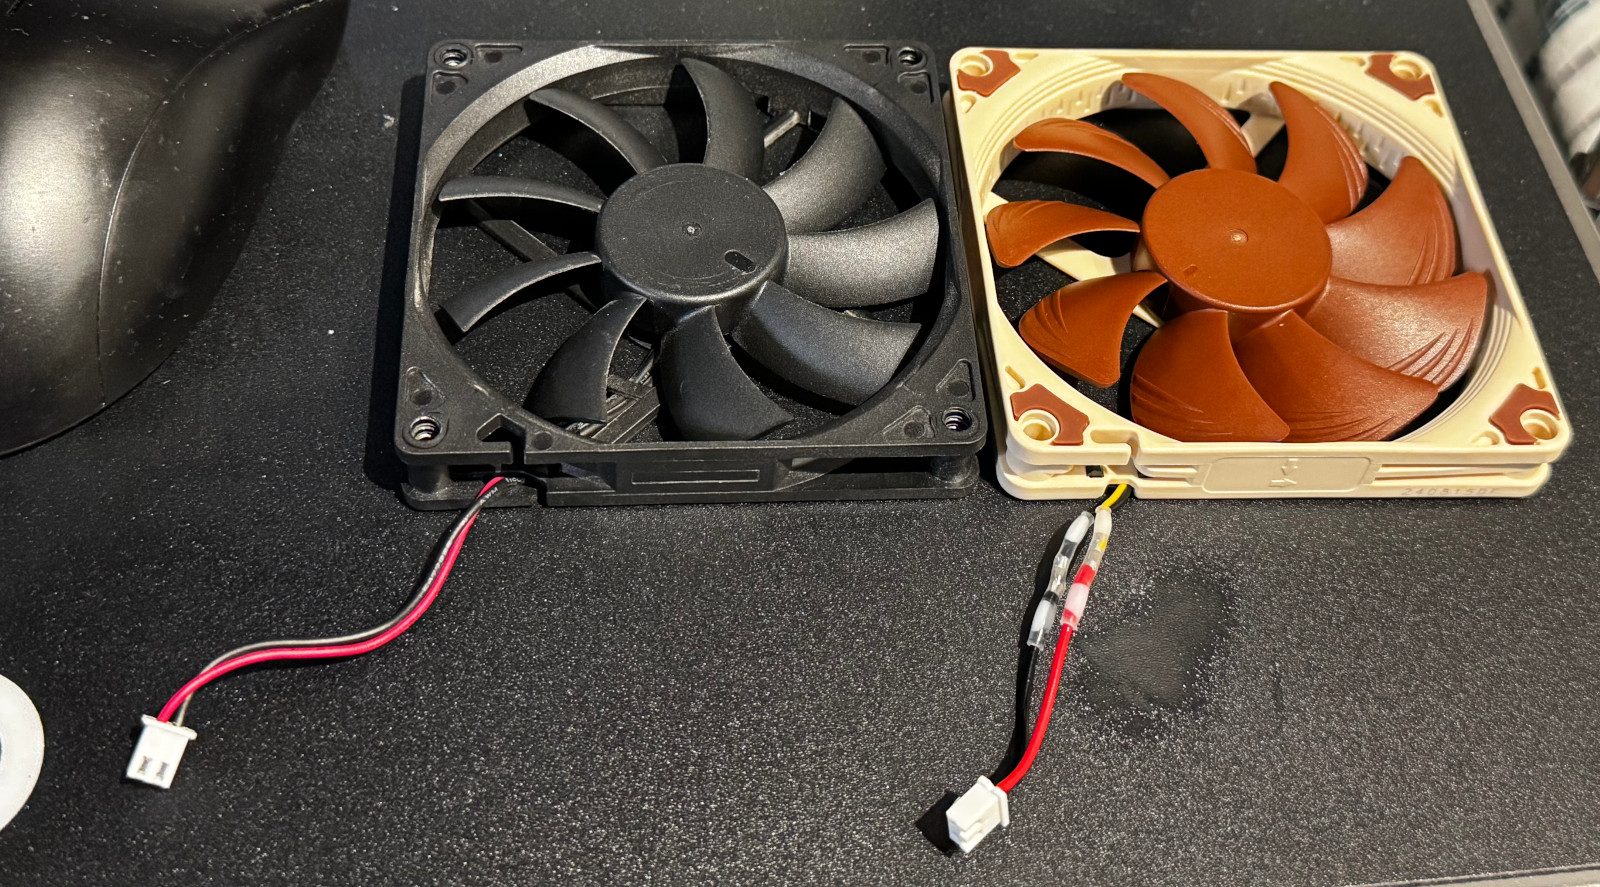
or some other variety of doom and gloom. There were some actually useful results sprinkled in, though. A post on the smallformfactor.net forums details someone swapping out the fan on the 850W version of the same power supply because it was too noisy. It looks like the fan connector in the PSU is a two-pin connector, and they just used an off-the-shelf adapter to convert the standard four-pin case fan connector. It sounded a bit annoying to make it all fit, though.
A similar post on reddit showed basically the same upgrade, but identified the connector as a 2.54mm JST-XH. They crimped their own connector on, which feels a lot better than using a bulky connector. I do have a crimping set for JST connectors, but I absolutely hate doing them because they’re so fiddly and annoying. I’m not sure if I trust one of my crimps inside a power supply, either.
Looking at the pictures in those posts, I identified the fan as an Ong Hua HA9215VH12FD-F00. I
searched to see if I could see any specifications for it. I couldn’t. But what I did get back as my first
result was another Reddit post, this one titled
“Getting rid of a HA9215SH12FD-F00 fan from your PSU”. It says something about the quality of a component when the first result is a post about getting rid of
it because it’s annoying.
All of these mods seemed easy enough, and I’m reasonably confident in my ability to both discharge and avoid touching capacitors, so I probably wouldn’t die. I ordered a Noctua NF-A9x14 fan and some pre-made JST-XH connectors and waited for them to arrive.
Upgrade time
The replacement parts arrived one evening, so when I turned the computer off for the night I unplugged it from the mains, held the power button down for a while, and left it overnight for good measure. The next morning I popped open the case, disconnected and removed the PSU, gleefully tore the “warranty void if removed” sticker off, and opened it up.
Removing the fan was simple: unplug the JST connector and undo the screws holding it to the outer panel. I confirmed that my JST connectors were the right size, then started surgery on the Noctua fan. I carefully removed the heatshrink, cut off the normal fan connector, and separated out the four wires. A quick check of their FAQ confirmed the wiring colours: black was ground, yellow +12V, and blue and green used for speed control (which we’re not using in this instance). I clipped the blue and green wires off near the hub so they wouldn’t be in the way, then cut the yellow and black wires down to length, and attached the JST connector with a solder seal:

In the process I discovered my mouse mat doesn’t like being hit with a heat gun. Whoops. The solder seals are great: the solder in the center melts to form an electrical connection, the parts at the end grip the cable to provide mechanical strength, and the whole thing acts like heatshrink and keeps the connection insulated. A lot less fiddly than crimping JST connectors, and a lot smaller and cheaper than an adapter.
I installed the fan and reassembled the PSU. Then undid it all and tried again, as apparently the face the fan mounts to isn’t quite symmetrical and I’d installed the fan upside down. Connected everything back up, plugged the computer in, booted it up, and… nothing. The PSU doesn’t actually power the fan until it hits a certain temperature. I figured putting it under load would probably heat it up, so ran a graphics benchmark a few times. Eventually the fan spun up. Huzzah.

Peace at last
I measured the sound of the new fan: 43 dB. That’s a decrease of 20 dB. Due to the weird logarithmic properties of the dB scale that no one understands, that means it sounds about 4 times quieter to human ears. Big improvement!
It’s worth pointing out this isn’t a straight one-to-one upgrade. I don’t know the specs of the old fan in terms of airflow, and I’m just assuming that the Noctua will be good enough by virtue of being a decent fan. They also behave slightly differently as the power ramps up: the stock fan starts spinning at a lower voltage than the Noctua, which needs around 7V to get started properly. I don’t think this will be an issue, as it’s effectively just putting a small step at the lower end of the fan curve. It might shorten the overall lifespan of the PSU, but from my point of view it failed after four months, so any extra time is a bonus.
I recorded some before/after audio, so you can hear the difference. I think there’s some amount of volume normalisation going on, so it’s not quite as stark a difference as in person, but it’s still noticeable.
And if you couldn’t hear it, here’s a visual representation:

The whole upgrade took about an hour (less time than writing this post about it!), and I even managed to avoid killing myself.